What is BestCutPro?
BestCutPro is a professional automation plugin designed directly for Adobe Premiere Pro and DaVinci Resolve. Our goal is to handle the tedious editorial tasks—scrubbing silences, fixing um's and uh's, adding zooms, and syncing B-roll—so you can spend your time creatively crafting the story.
Unlike cloud-based tools, BestCutPro processes video entirely on your machine using advanced local AI models like Whisper and FFmpeg. This means zero upload times and 100% data privacy.
Pro Tip for Editors
All edits made by BestCutPro happen directly on your timeline as standard cuts, meaning you maintain complete creative control and can easily tweak any edit later if needed.
Release Notes
Track the latest BestCutPro updates here. Release notes are sorted by date, and the newest release stays open by default.
March 30, 2026
Major documentation, onboarding, performance, accessibility, and support workflow improvements.
Highlights
- Expanded the docs experience with a guided section-by-section flow, install screenshots, and an embedded installation video.
- Rebuilt the Turkish docs page as a real localized page instead of a redirect.
- Improved homepage performance with optimized images, lazy media loading, and lighter mobile animation behavior.
- Hardened accessibility across core pages with better tab semantics, heading structure, and contrast.
- Fixed the feedback email workflow and added debug logging for support delivery verification.
Documentation Updates
- Added purchase, download, installation, activation, and onboarding screenshots.
- Updated the install flow around drag-and-drop ZXP setup in Anastasiy's Extension Manager.
- Added the first-time onboarding and dependency-check guidance for FFmpeg, FFprobe, and Whisper.
Website & Support Updates
- Removed the Reviews link from the main navigation where it was no longer needed.
- Removed the Plugin Inventory / AI-Powered Core Features section from the homepage.
- Updated static cache policy and support mail handling for more reliable production behavior.
March 12, 2026
Site structure and launch-prep update
Homepage UX, feature landing structure, pricing separation, docs/reviews/dashboard pages, and security hardening update.
Highlights
- Improved the homepage marketing and UX flow across hero, workflow, proof, and app-scene areas.
- Expanded feature landing coverage with Silence, Multicam, and Highlights pages in both EN and TR.
- Split pricing into dedicated EN/TR pages and expanded top-level navigation.
- Added docs, reviews, and dashboard placeholder pages for both languages.
- Applied security hardening across `.htaccess`, `server.js`, and missing CSP/referrer coverage.
Installation
BestCutPro is installed as a CEP extension for Premiere Pro. Follow the exact post-purchase flow below.
Before you start (requirements checklist)
- Premiere Pro: Adobe Premiere Pro 2020+ installed and working.
- Operating System: macOS (Intel/Apple Silicon) or Windows 10/11.
- Internet: Required for first activation, license verification, updates, and online integrations.
- FFmpeg/FFprobe: Required dependency for core processing workflows.
- Optional keys: Pexels/Pixabay API keys for B-Roll integrations.
Step 1 — Complete purchase and get your license instantly
- After payment, your license key is shown on the success/thank-you page immediately.
- The same license details are also sent to your purchase email for backup.
- Save this key; you will enter it when opening BestCutPro for the first time.
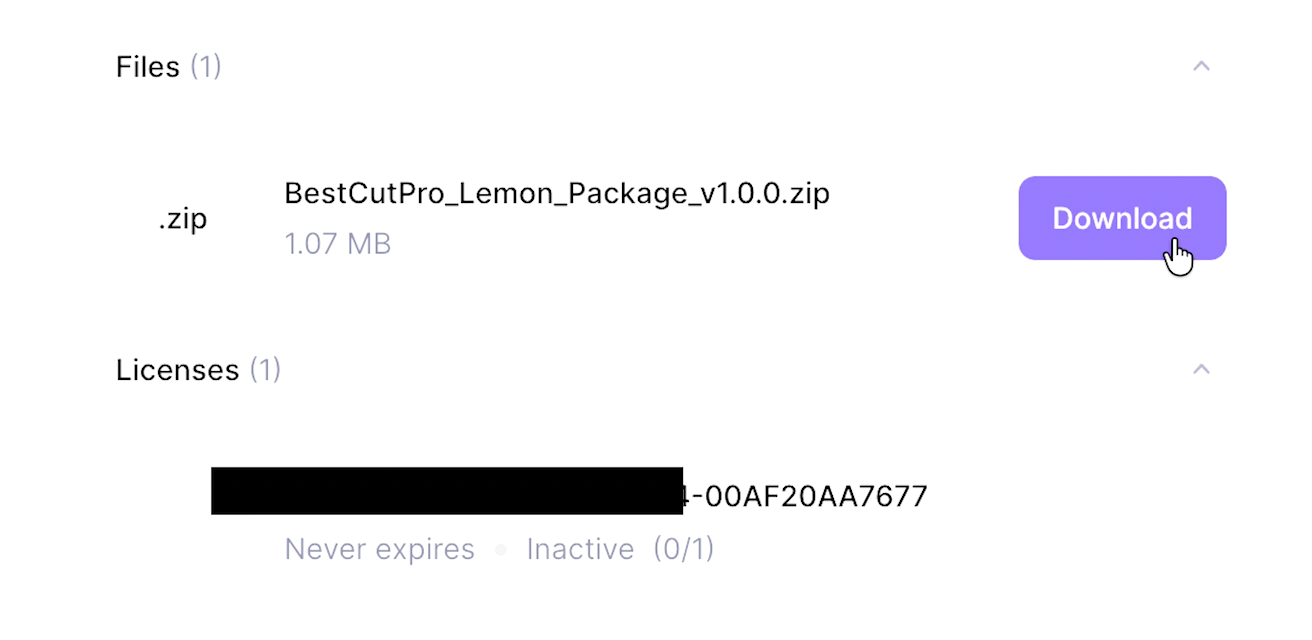
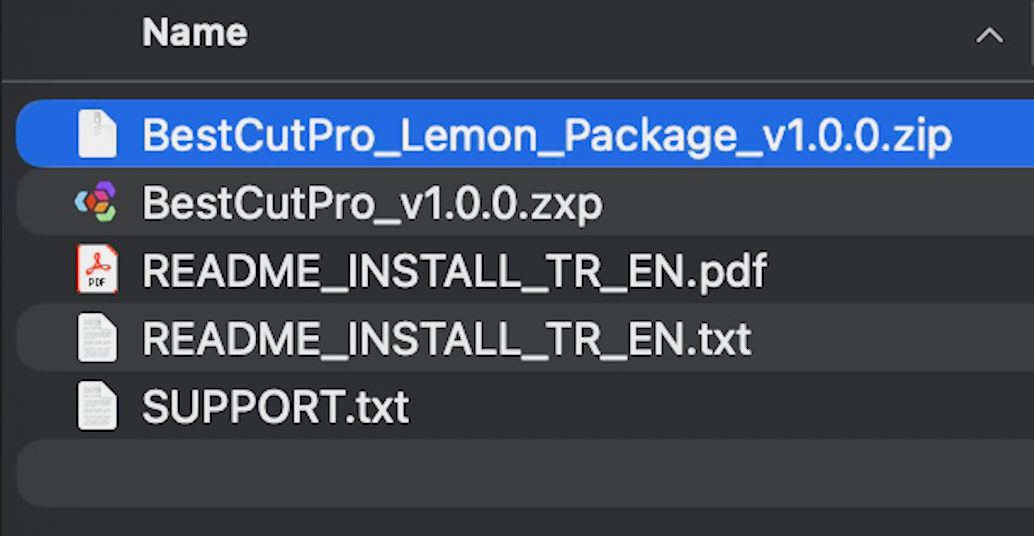
Step 2 — Download required files
- Open your account/download page.
- Download the latest
BestCutPro.zxppackage. - If requested in your account panel, also download any companion setup files provided with your plan.
BestCutPro.zxp highlighted:
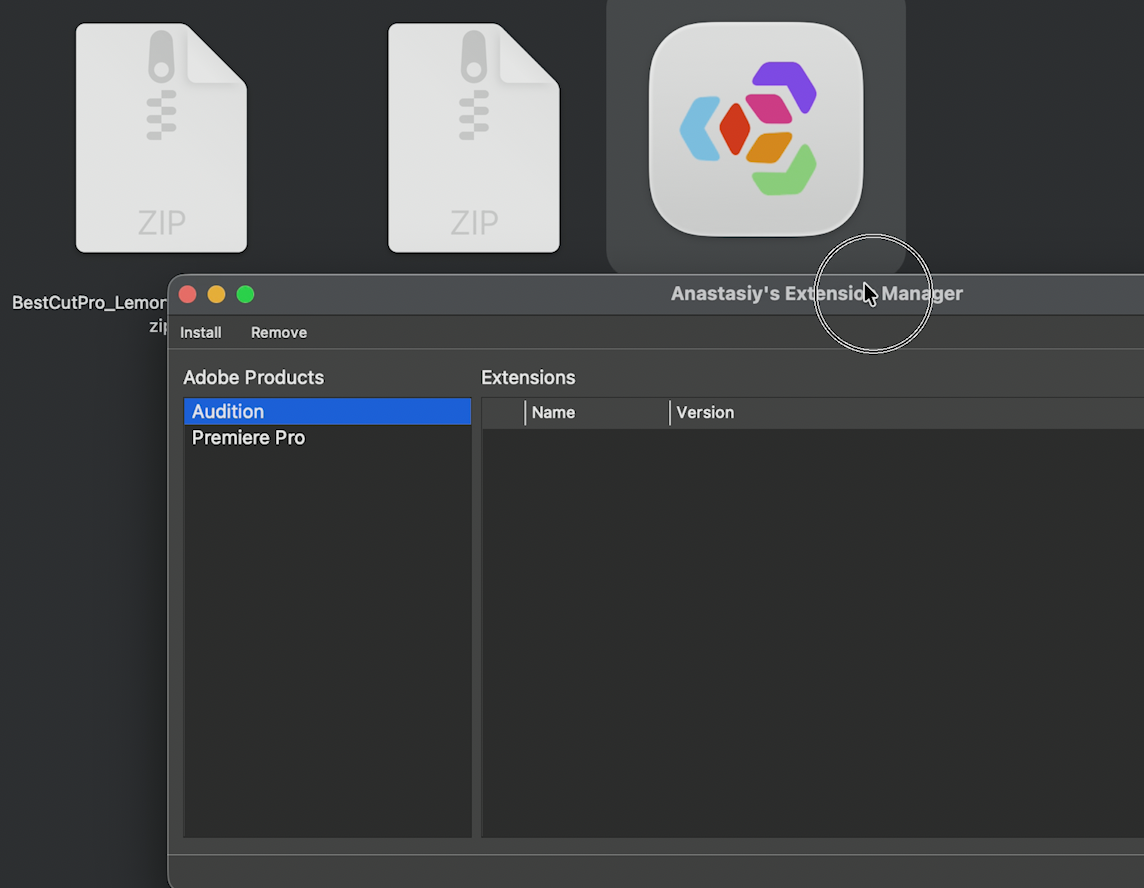
Step 3 — Install with Anastasiy's Extension Manager
- Install/open Anastasiy's Extension Manager (install.anastasiy.com).
- Open the manager window where your installed extensions are listed.
- Drag and drop
BestCutPro.zxpdirectly into the Extension Manager to start installation. - Wait for the "Installed" confirmation/status.
- Restart Premiere Pro after installation completes.
BestCutPro.zxp in Anastasiy's Extension Manager.
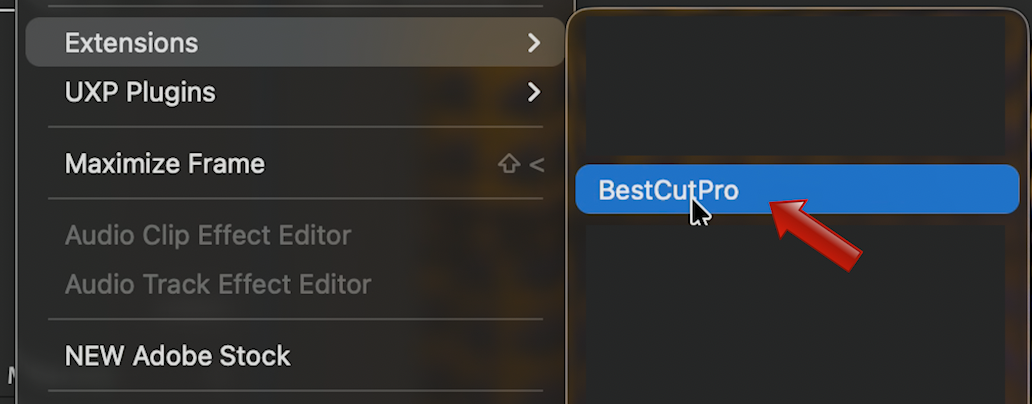
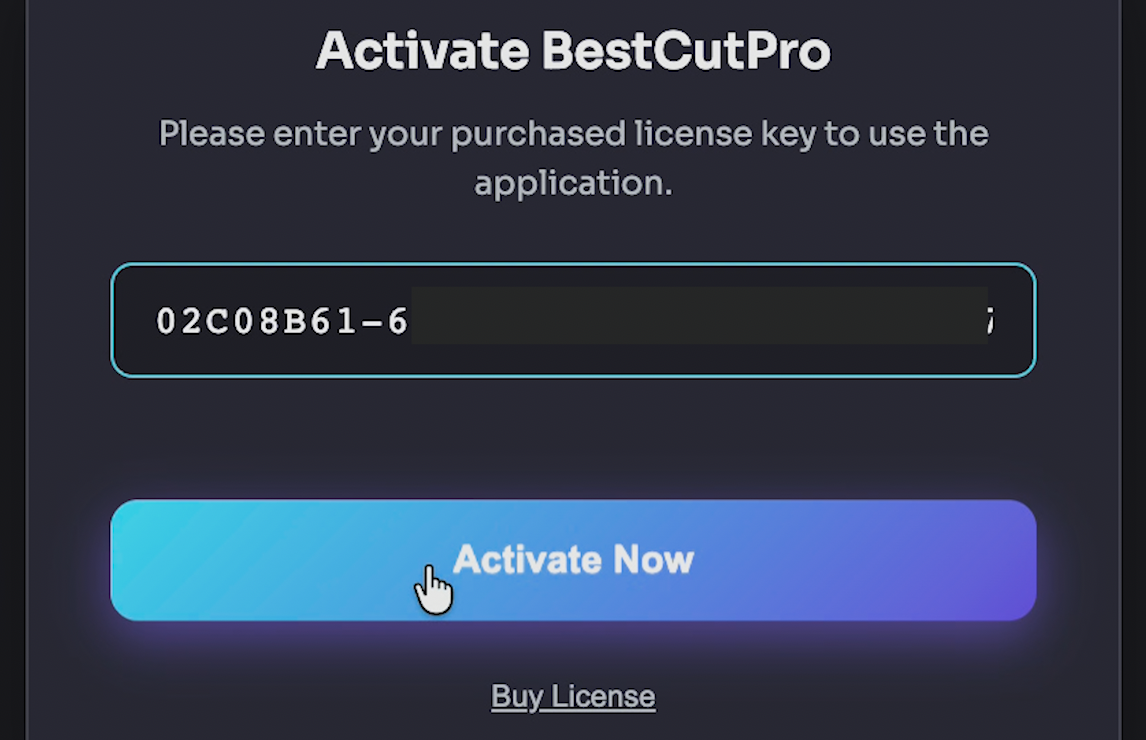
Step 4 — Open and activate inside Premiere Pro
- In Premiere Pro go to
Window > Extensions > BestCutPro. - Paste your purchased license key into the activation screen.
- Click Activate and wait for the success status.
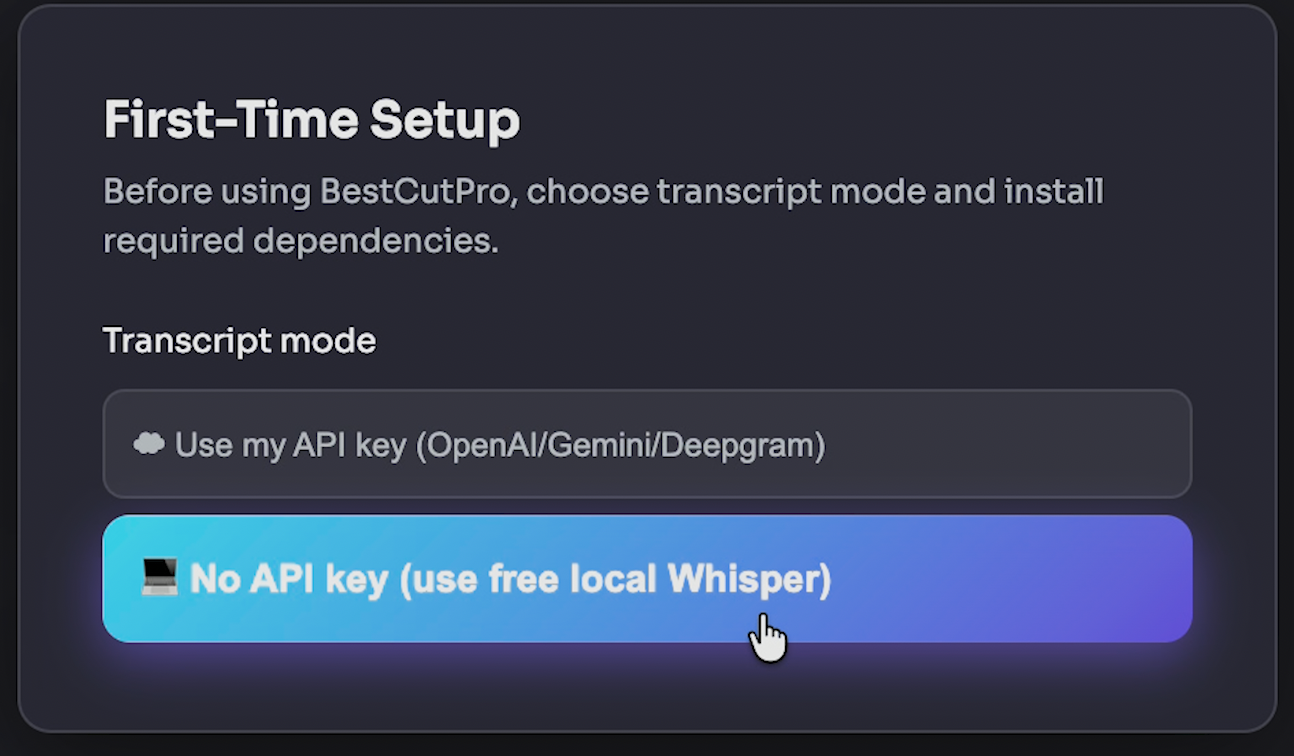
Step 5 — First-time setup (onboarding)
- Select transcript mode: Choose Local (Whisper-based local processing) or Cloud (OpenAI / Gemini / Deepgram API key-based processing).
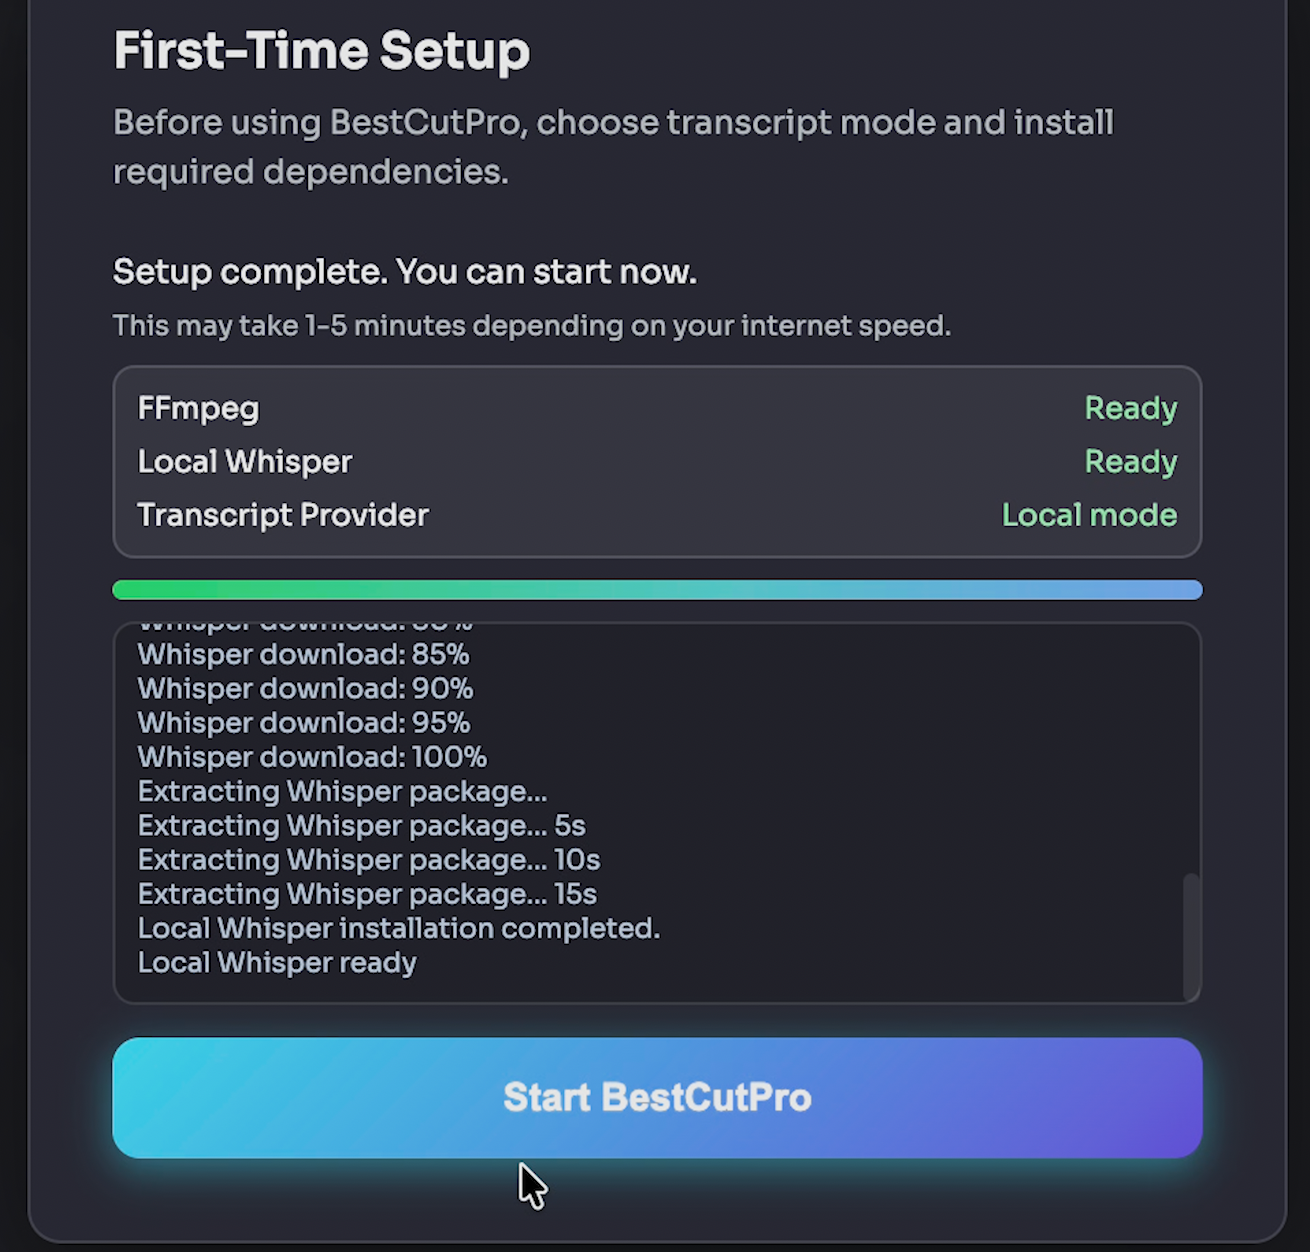
- Dependency checks run automatically: BestCutPro checks FFmpeg / FFprobe, and Whisper when Local mode is selected.
- Missing components are handled with guided setup: If something is missing, the app starts an automatic install / setup guide flow.
- Setup state is saved: After onboarding is completed, installation and dependency status are stored persistently.
FFmpeg Installation Is Required
BestCutPro requires FFmpeg and FFprobe to run core analysis actions. The app can guide setup automatically, but we strongly recommend installing FFmpeg on your system in advance as a fallback.
Permission & Security Notes
On macOS, you may need to allow Premiere Pro in Security & Privacy settings. Keep your license key private and do not share it publicly.
Internet Requirement
BestCutPro works locally for editing operations, but internet access is still needed for license checks, update delivery, and API-based tools (B-Roll and social generation flows).
Dependencies: FFmpeg & Whisper
When you launch BestCutPro for the very first time, it performs a dependency check. To process audio streams rapidly without Premiere's slow exports, the plugin utilizes FFmpeg and FFprobe.
- Windows: Install via
winget install Gyan.FFmpegor download static builds from gyan.dev. - macOS: Install via Homebrew:
brew install ffmpegor download builds from evermeet.cx. - Linux: Install with your package manager (for example
sudo apt install ffmpeg) or use your distro repository. - Official Source: ffmpeg.org/download.html
Manual Path Setup (If Needed)
If FFmpeg is installed but still not detected, copy the binary path and paste it into Settings (Gear Icon) > FFmpeg Path inside BestCutPro.
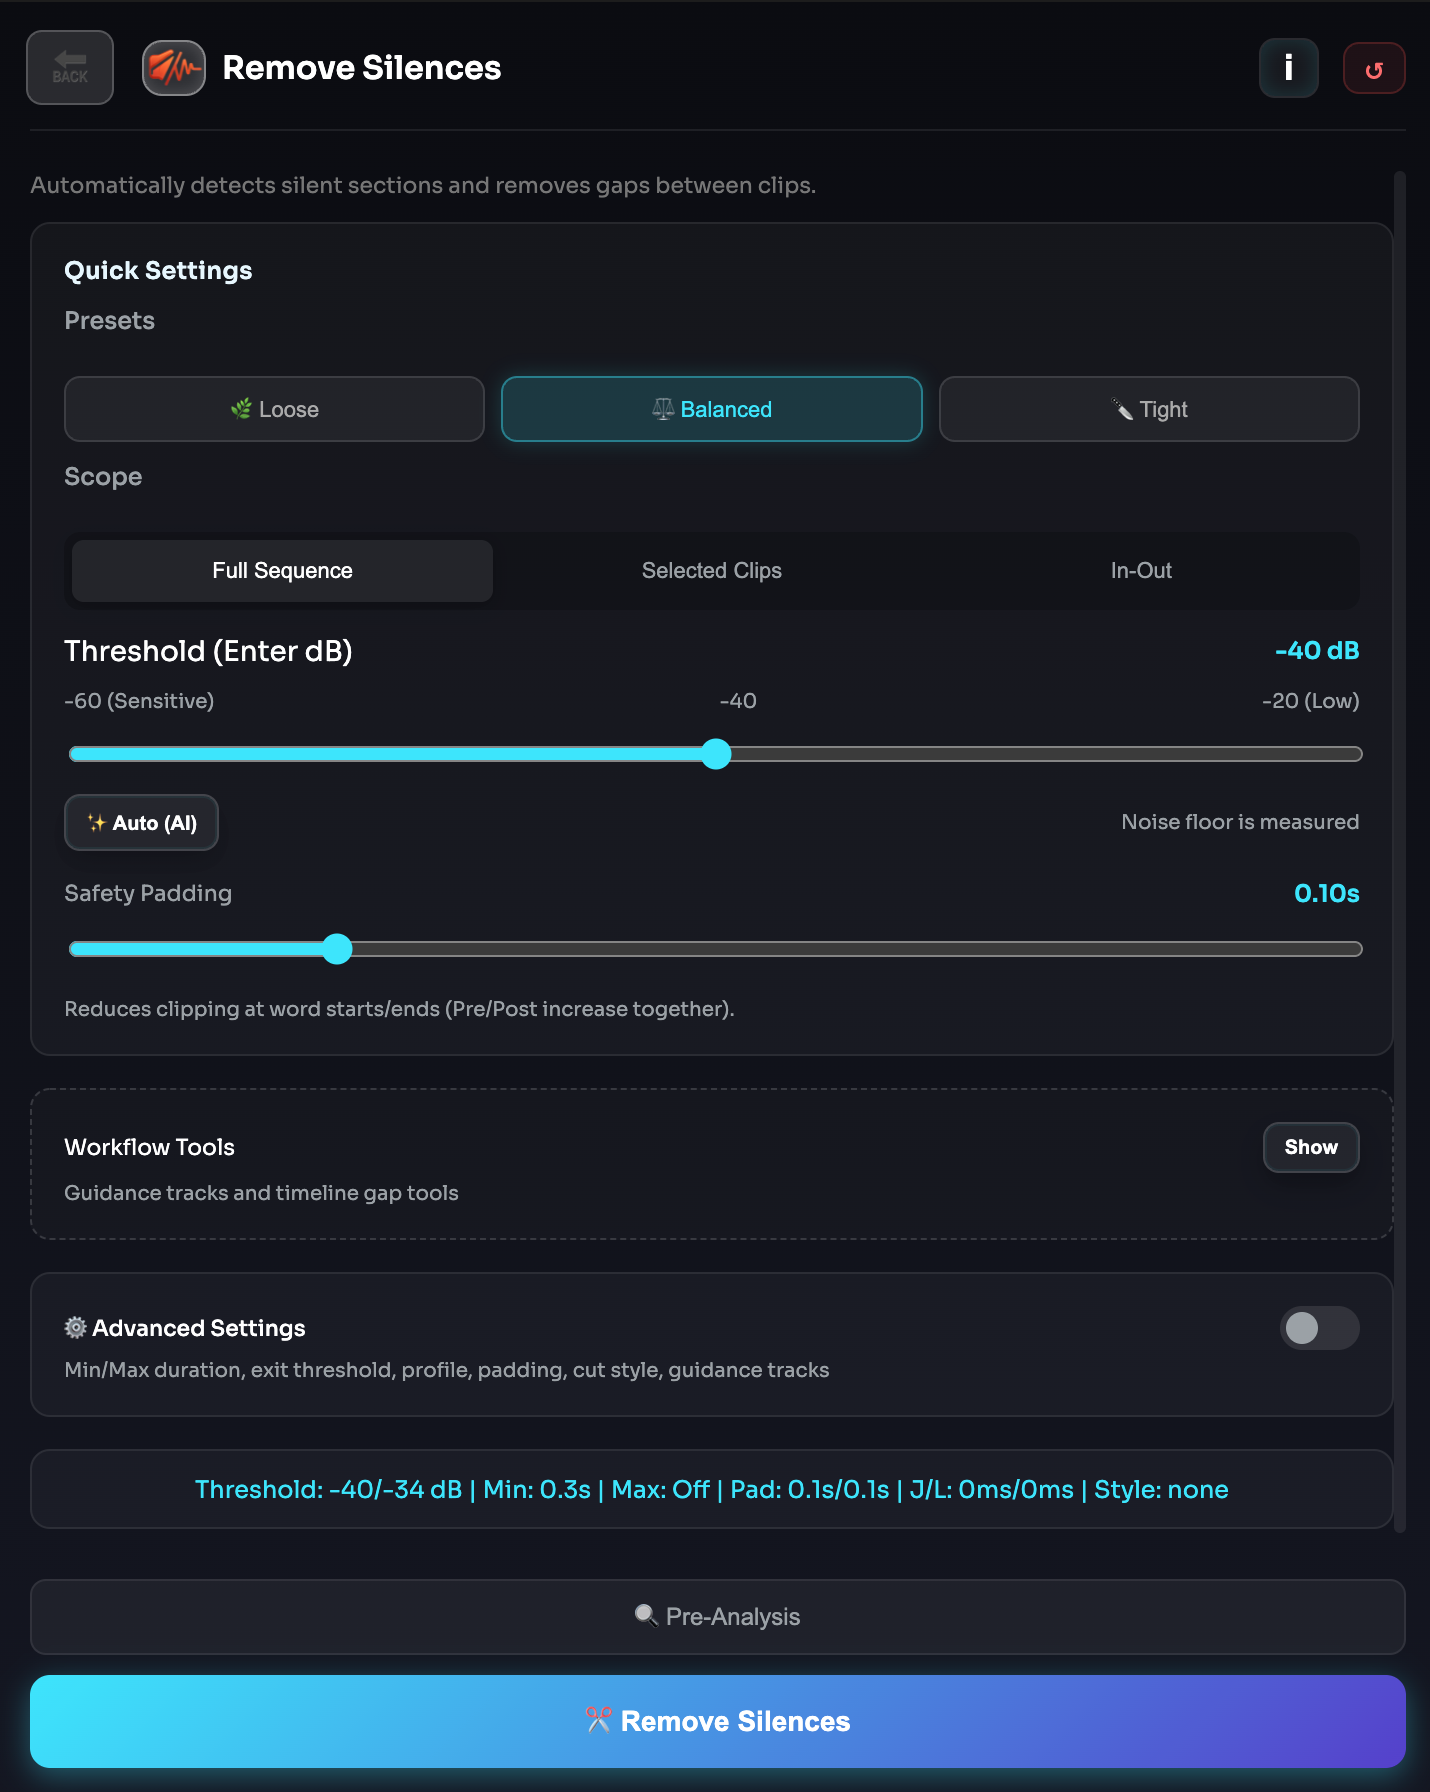
Silence Remover
Silence Remover - Precision Pacing Engine for Premiere Pro
BestCutPro's Silence Remover goes far beyond basic "detect and cut silence." It is built as a full pacing control system that helps editors speed up post-production while preserving natural speech flow and storytelling rhythm. Instead of blindly deleting pauses, you can analyze, audition, customize, and apply cuts with precision.
Why It Stands Out
Most silence tools rely on a single threshold and apply aggressive, one-size-fits-all cuts. That often leads to robotic pacing and unnatural dialogue flow.
BestCutPro combines:
- Intelligent pre-analysis
- Interactive editor controls
- Style-aware automation
- Confidence scoring and risk prioritization
This gives you speed and creative control.
1) Smart Pre-Analysis Engine
Before any cuts are applied, Silence Remover generates a detailed analysis pass:
- Detects silence ranges with start/end precision
- Supports Sequence, Selection, and In/Out scopes
- Uses Enter + Exit threshold behavior for more stable detection
- Applies Min/Max duration rules to avoid noisy micro-cuts
- Visualizes results with Audio Activity and Cut Region mapping
You always see what will happen before committing edits.
2) Interactive Silence List (Editor-First Workflow)
Detected regions are fully editable in a live list:
- Click any row to jump directly to that timeline position
- Per-region actions: Keep, Shorten (leave a controlled pause), or Cut
- Manually add custom silence ranges (start/end)
- Remove false positives
- Navigate quickly with Previous / Next controls
Automation proposes. The editor decides.
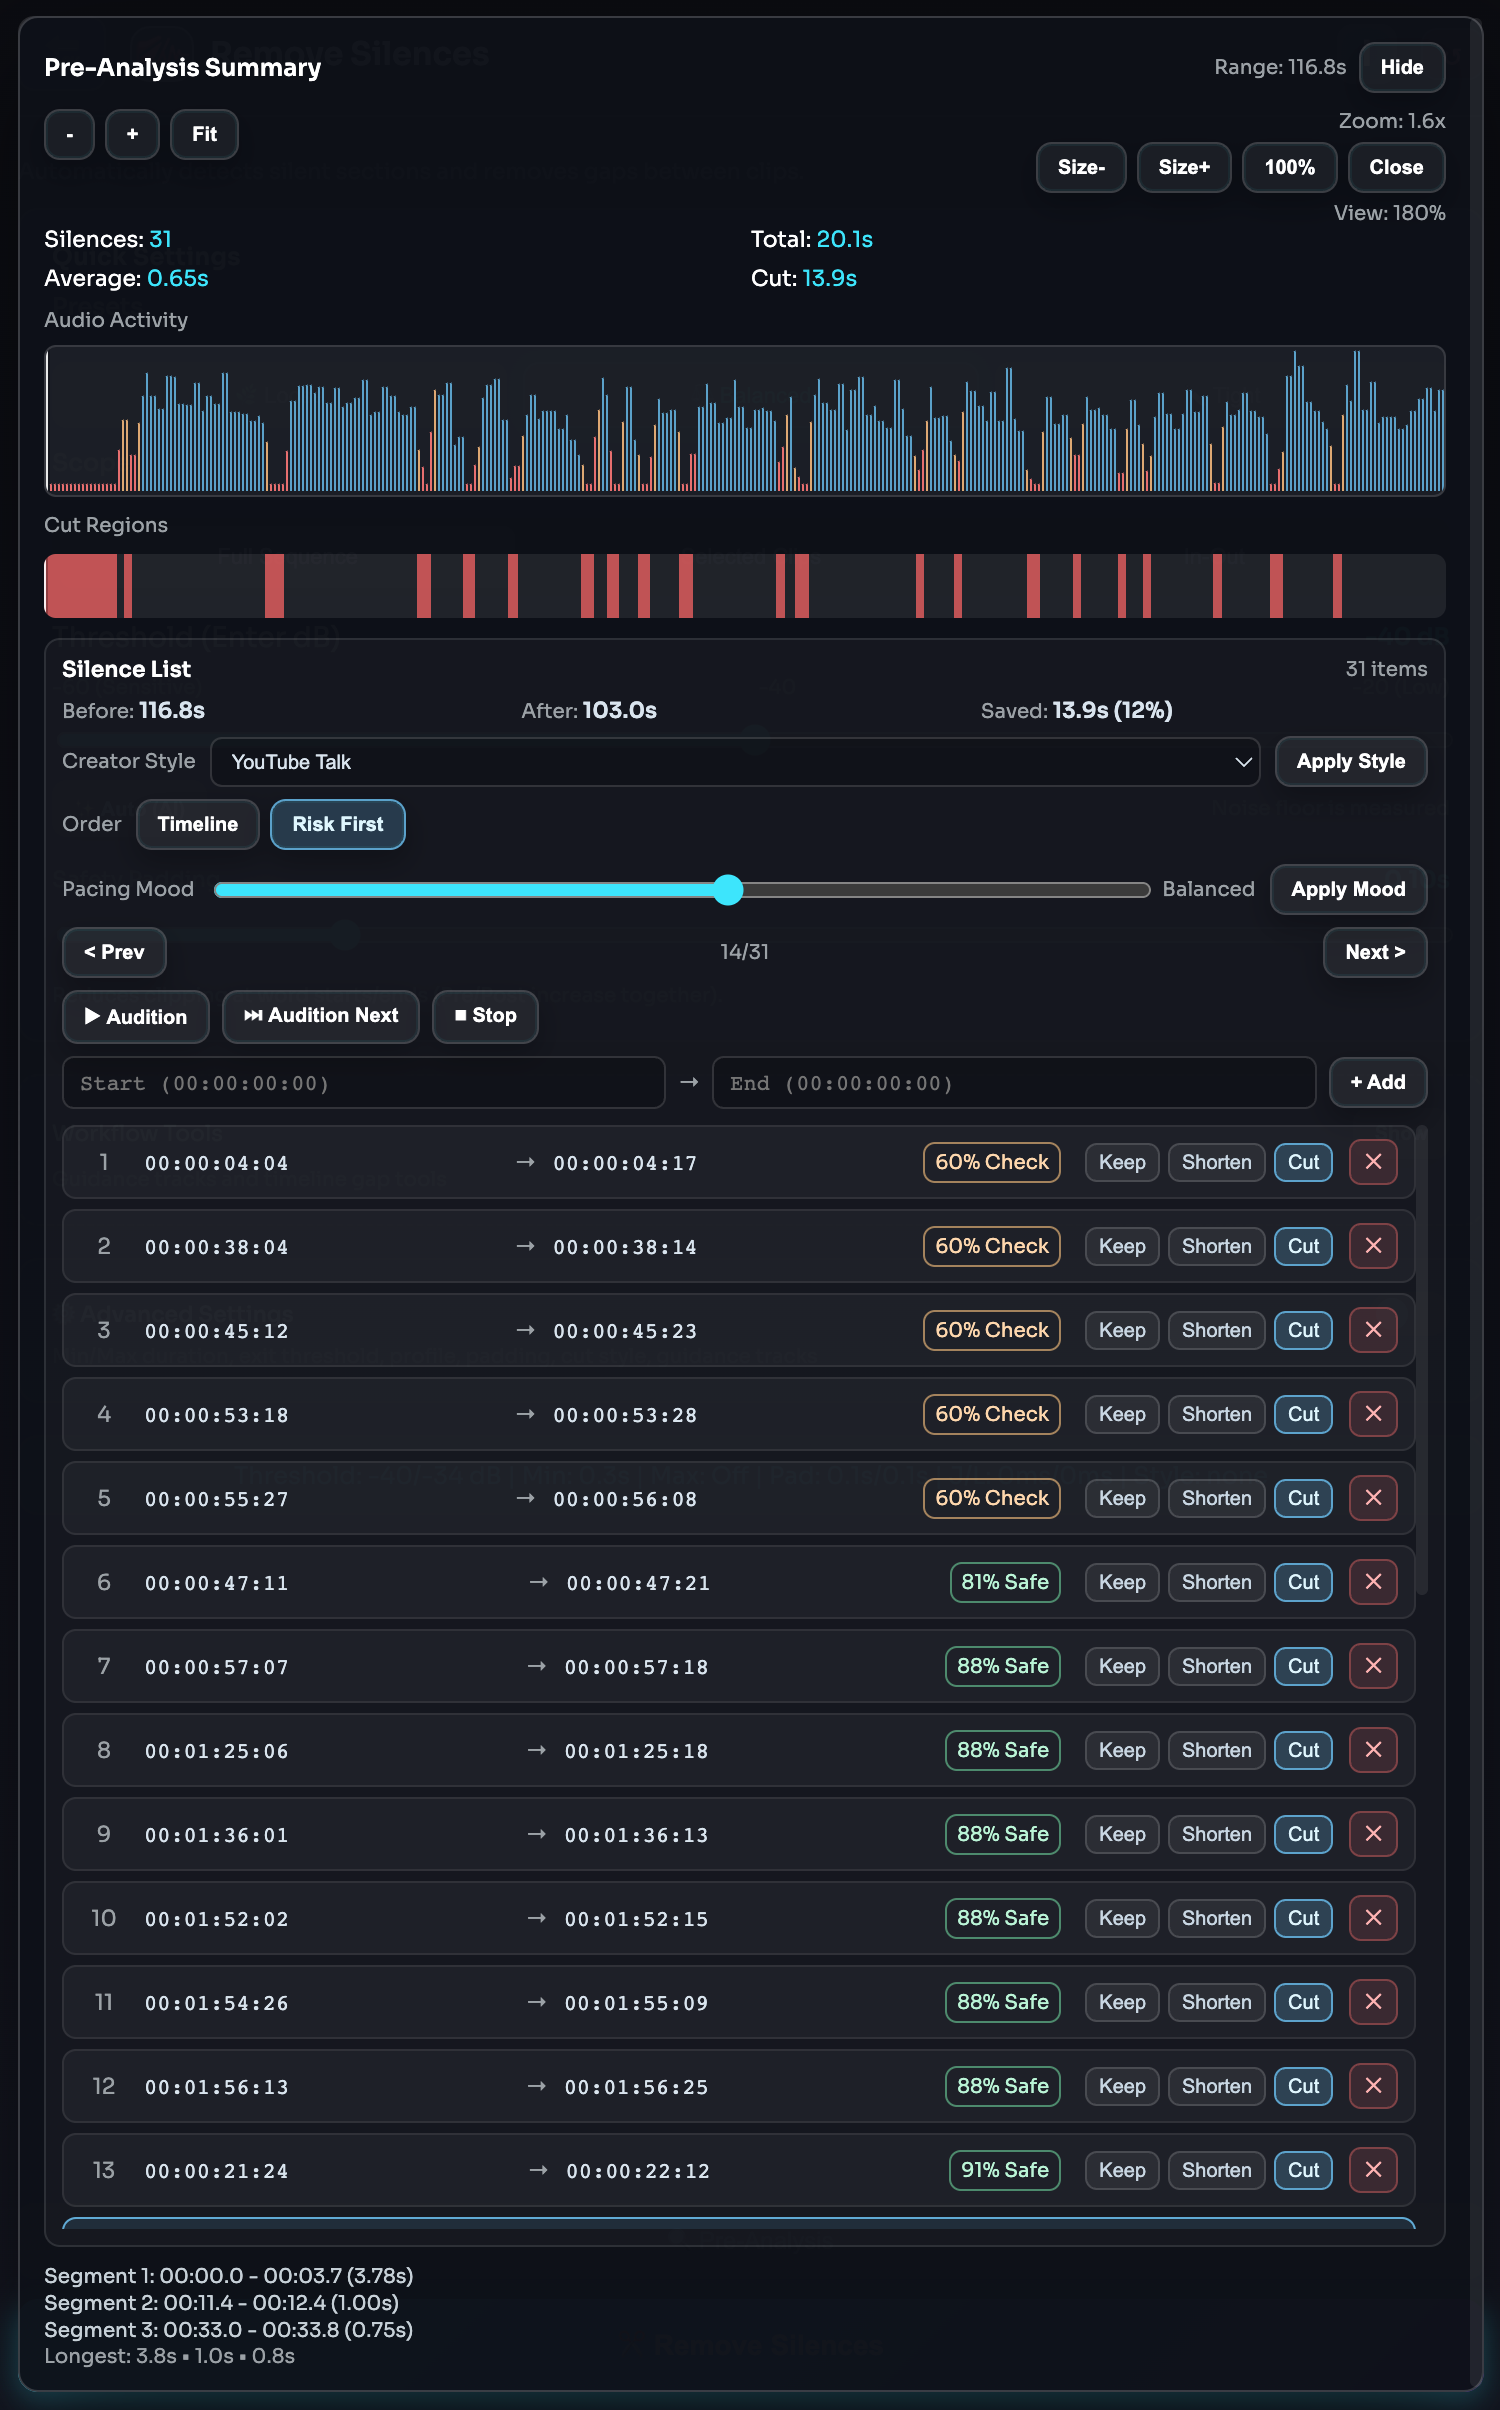
3) Global Pacing Mood Control
Use a single slider to shape the rhythm of the entire result set:
- Natural - keeps more breathing room
- Balanced - optimized for general talking-head content
- Aggressive - faster pacing for retention-heavy edits
This dramatically reduces manual decision time on long edits.
4) Before/After Impact Preview
See immediate projected impact before applying:
- Before duration (analysis window)
- After estimated duration
- Saved time + percentage reduction
This makes pacing decisions measurable, not guesswork.
5) Audition Workflow for Faster Decisions
Review suspicious regions before cutting:
- Audition - play selected silence context
- Audition Next - rapid review loop for batch decisions
- Stop - instant playback stop
This improves cut confidence and helps avoid over-editing speech.
6) Creator Style Intelligence
One-click style profiles adapt cut behavior to content type:
- YouTube Talk
- Podcast
- Reels/Shorts
- Interview
Each profile intelligently distributes Keep/Shorten/Cut behavior to match expected pacing style.
7) Confidence & Risk Scoring
Every silence region gets a confidence/risk signal:
- Labels such as Safe, Check, Risk
- Percentage confidence per row
- Risk First ordering to review high-risk cuts first
This helps editors focus attention where mistakes are most likely.
8) Fullscreen Analysis Workspace
Built for long-form sessions and dense cut lists:
- Fullscreen analysis mode
- Dynamic Silence List height that uses available space
- Collapsible analysis blocks for cleaner focus
- Efficient navigation even with large candidate sets
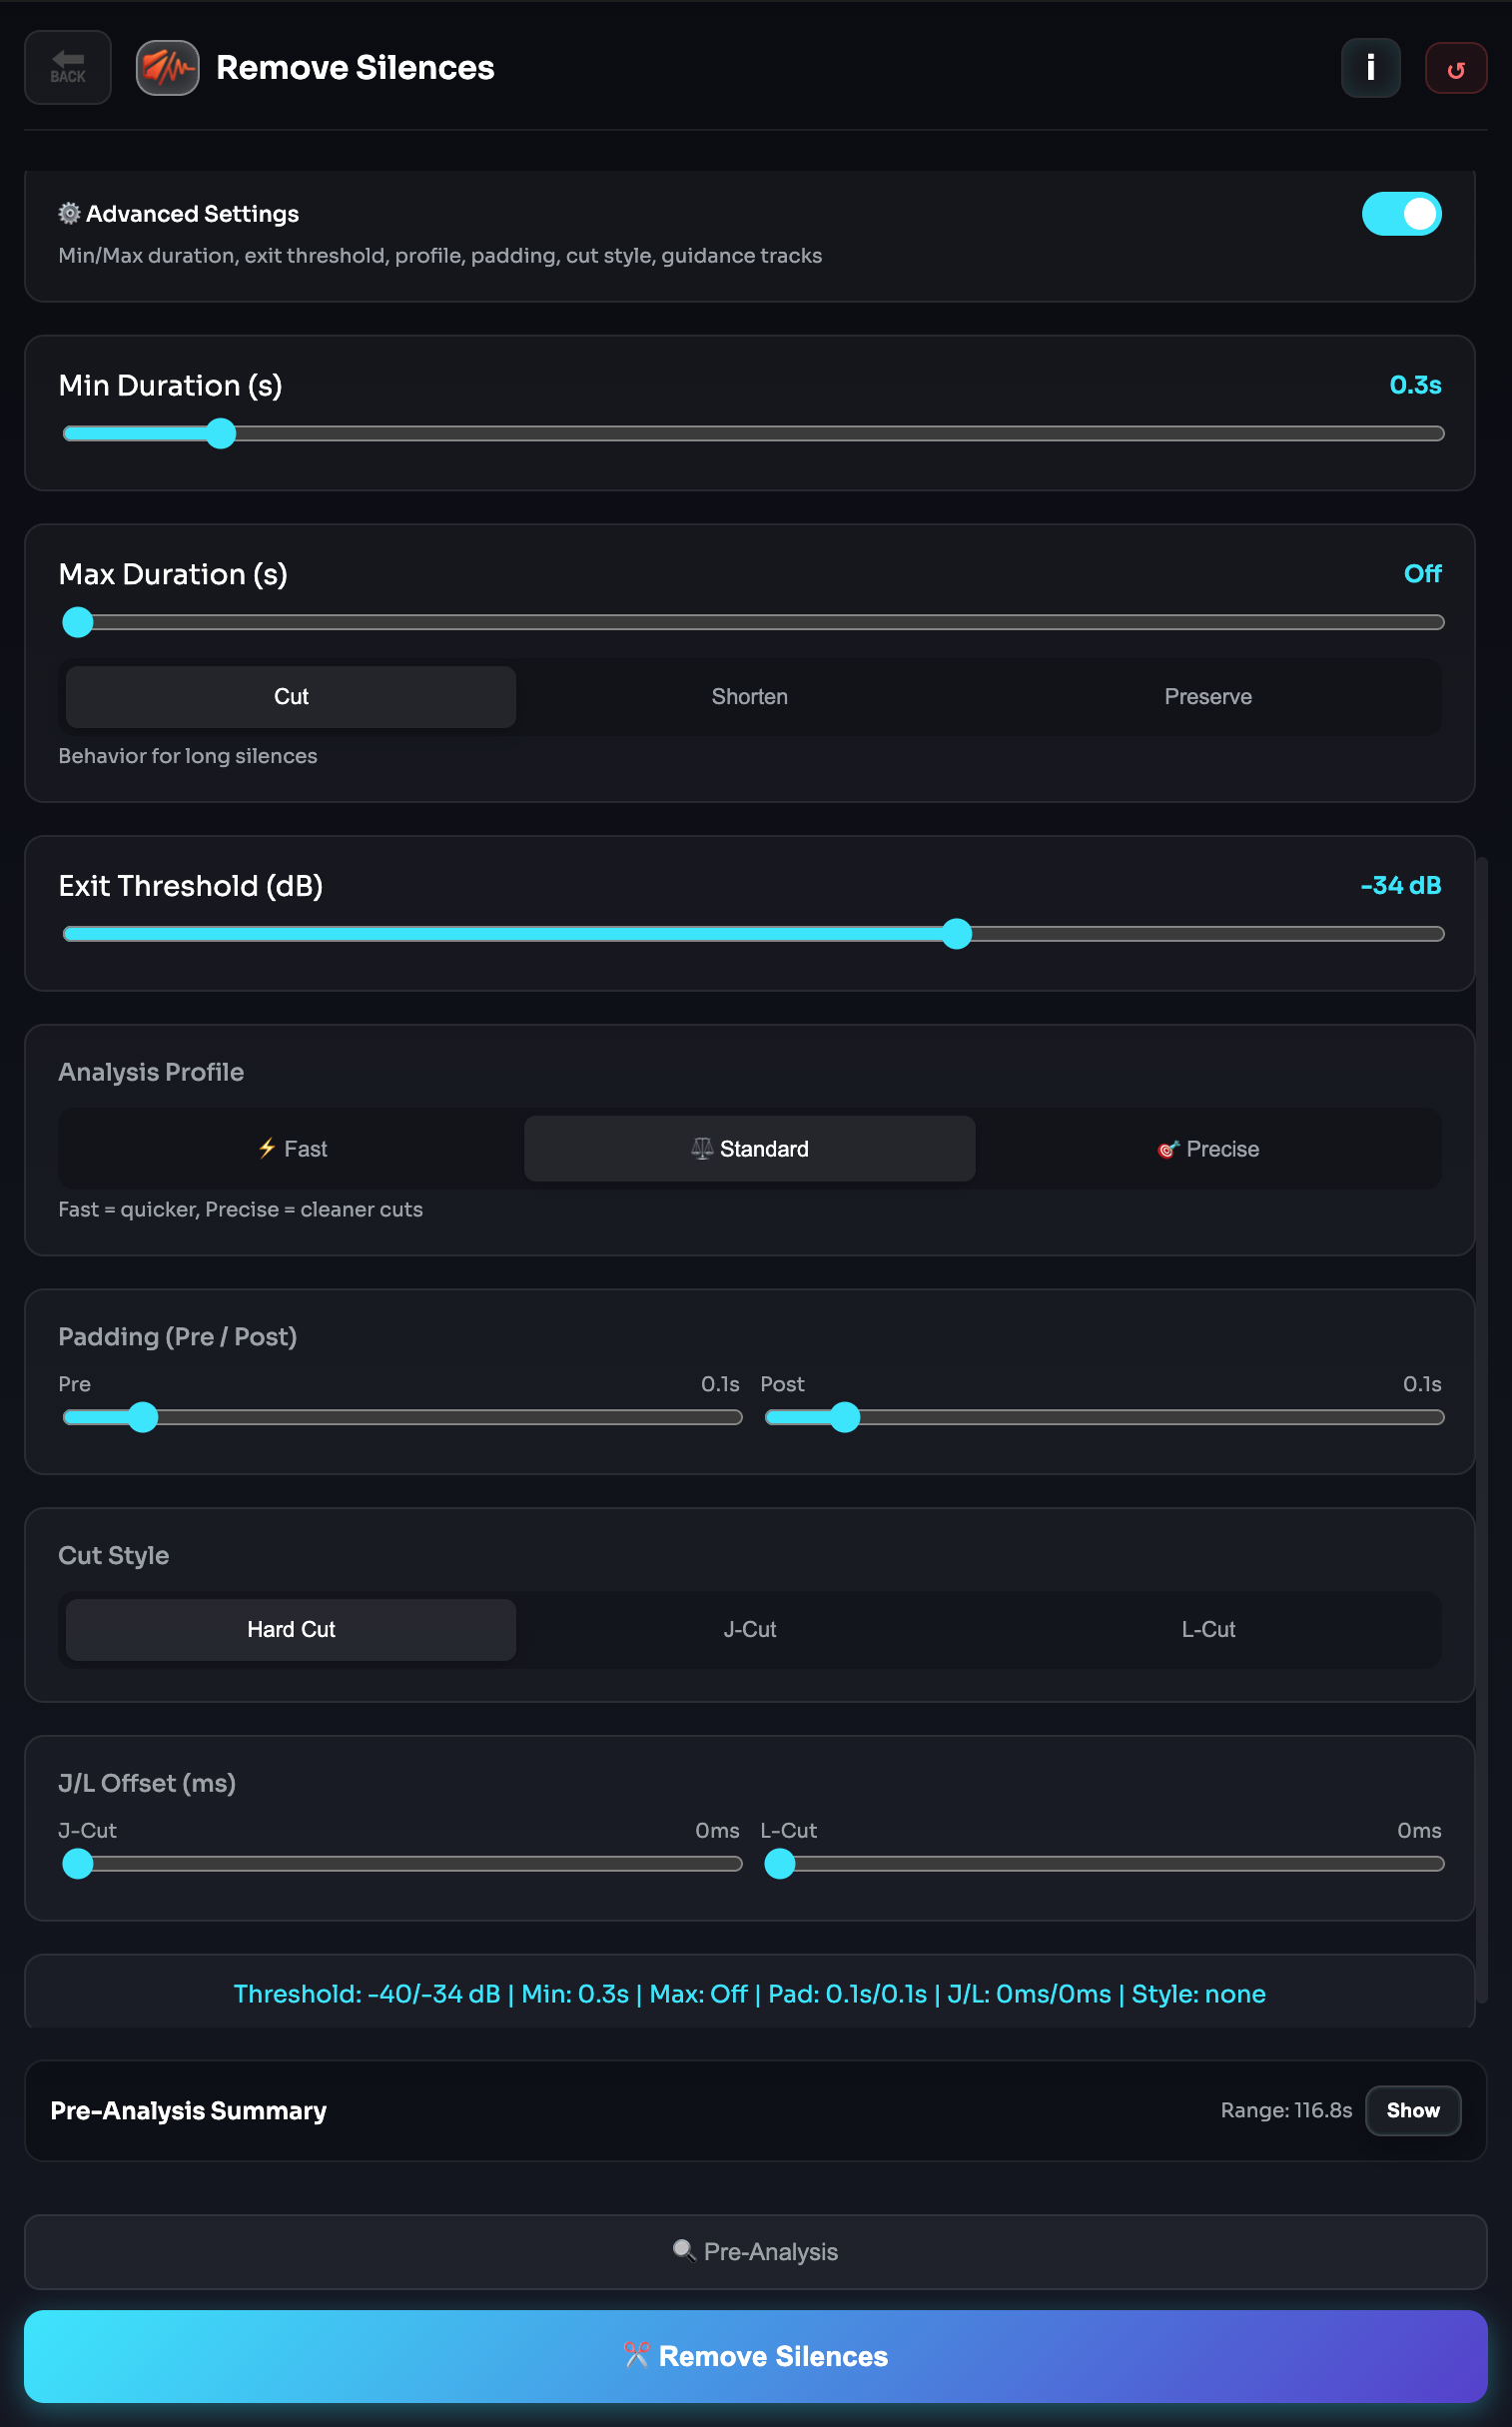
9) Advanced Controls for Power Users
When needed, fine-tune behavior at a professional level:
- Enter / Exit thresholds
- Min / Max silence duration
- Max mode (cut, shorten, preserve)
- Pre/Post padding
- J-Cut / L-Cut offsets
- Guidance track targeting
Beginners can stay in quick mode. Advanced users can go deep.
10) Controlled Automation, Not Blind Automation
Silence Remover is designed around a safe editorial flow:
- Analyze
- Inspect
- Audition
- Adjust
- Apply
You get the speed benefits of automation without losing editorial intent.
Practical Production Benefits
Teams typically use Silence Remover to:
- Reduce repetitive manual ripple-cut passes
- Speed up first-cut cleanup significantly
- Maintain natural dialogue pacing in spoken content
- Adapt pace quickly for long-form and short-form outputs
- Improve consistency across episodes and series
Positioning
BestCutPro Silence Remover transforms silence detection into an editor-controlled pacing system - faster edits, safer decisions, better rhythm.
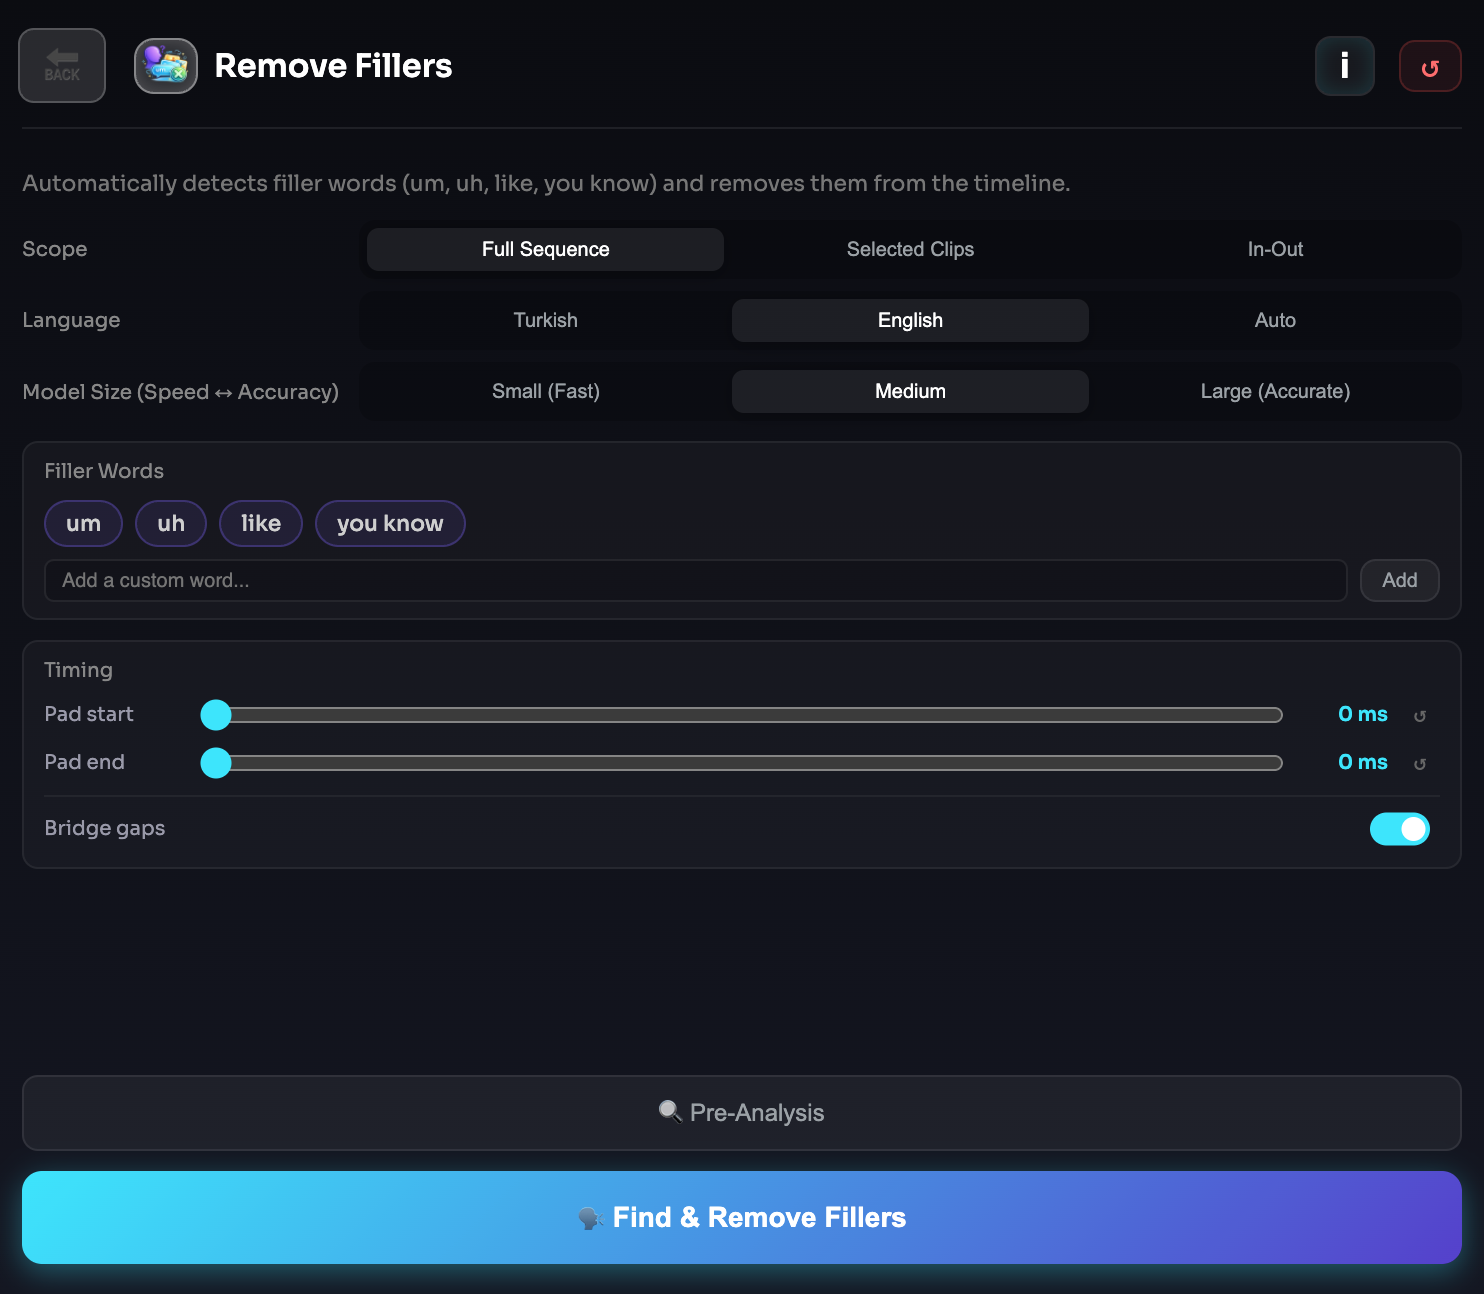
Filler Word Remover
Filler Remover automatically detects filler words such as "um", "uh", "you know", "like", and similar speech habits, then helps you remove them directly from the timeline.
It is designed to speed up cleanup for talking-head videos, podcasts, tutorials, interviews, and educational content.
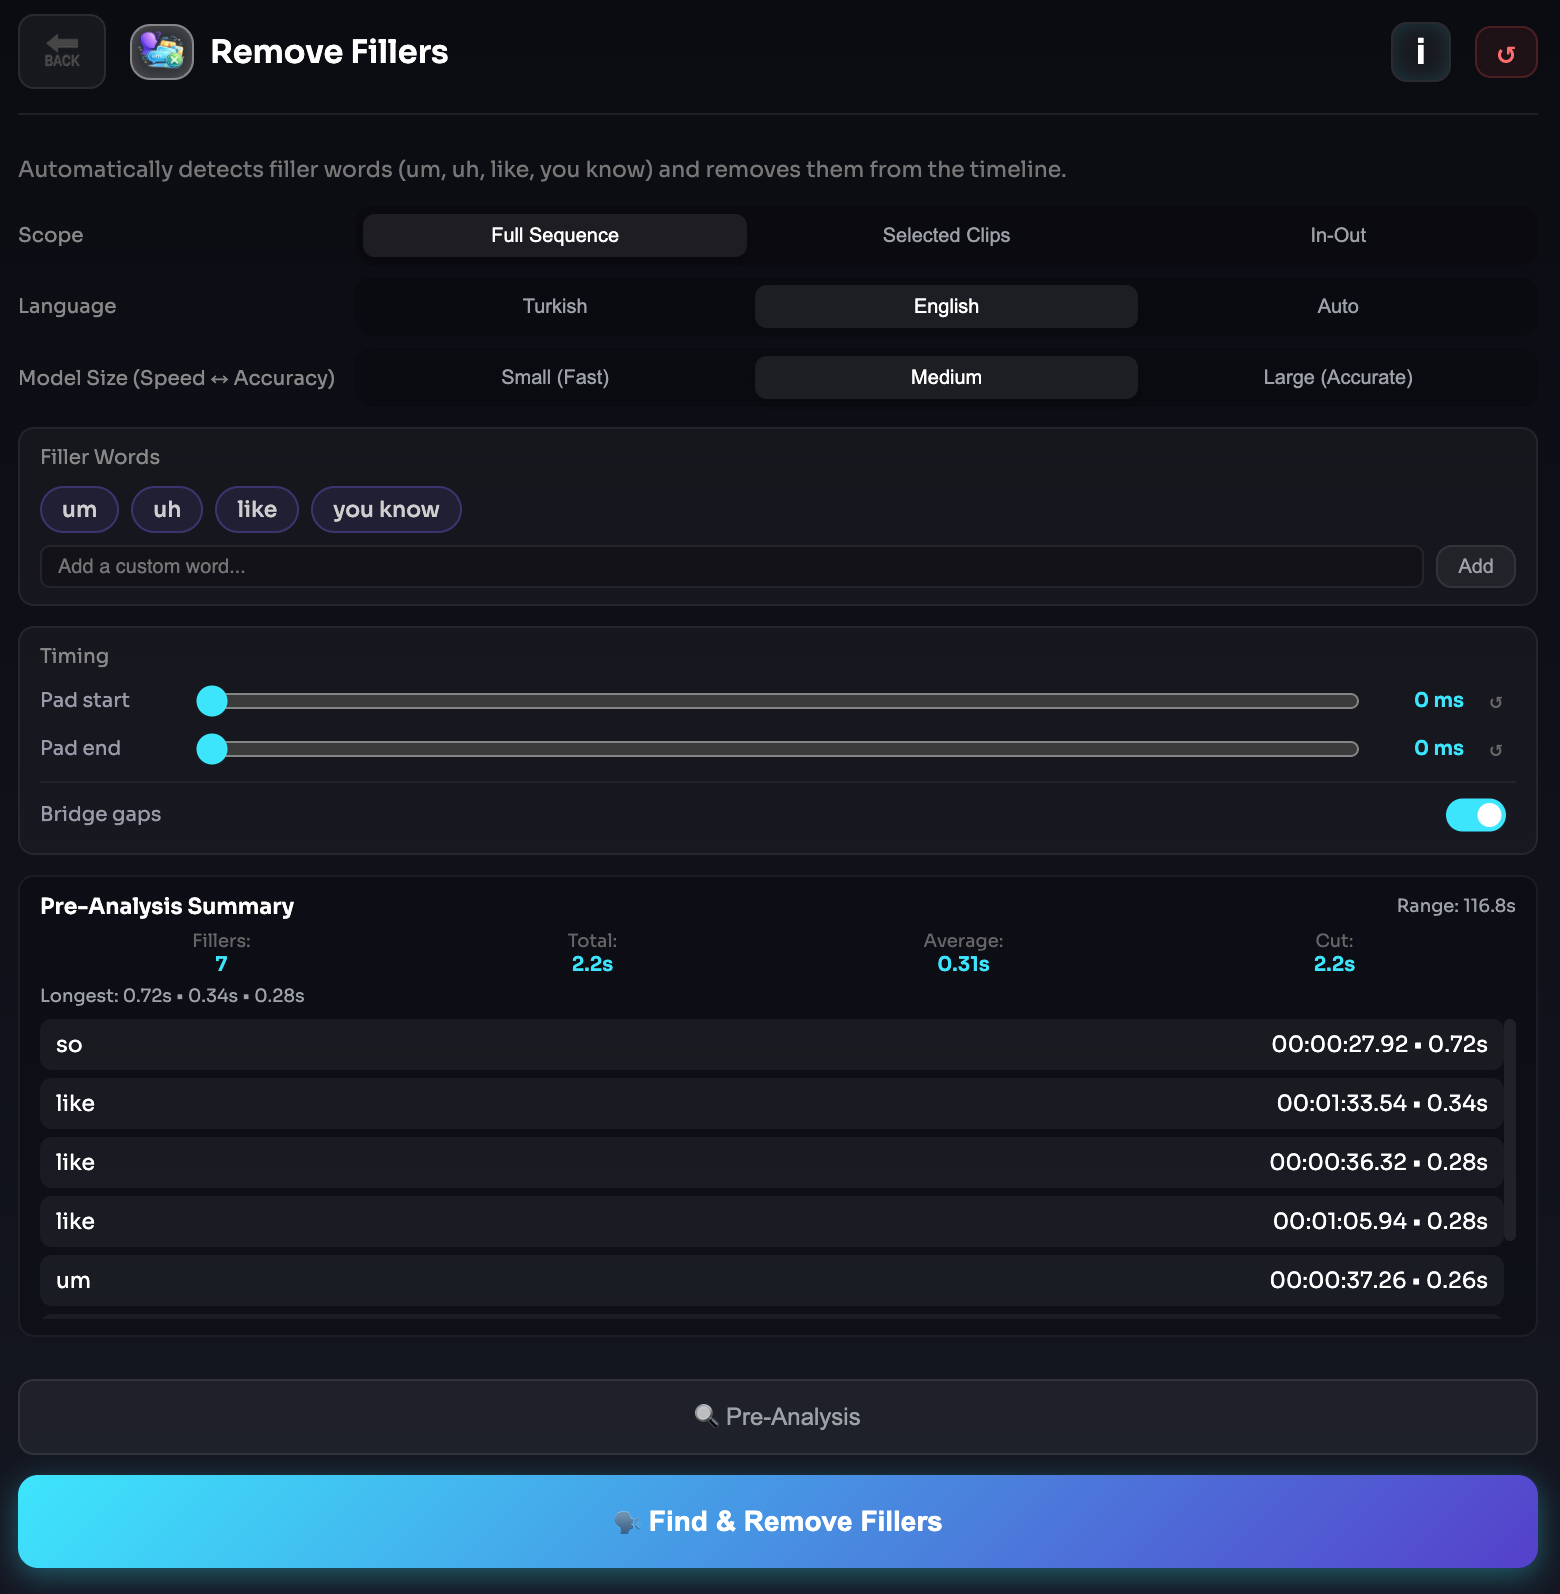
What It Does
This tool analyzes spoken content in your sequence, finds filler words, and presents them as editable results before any cuts are applied.
You can review the detected segments first, then decide whether to use the analysis as a preview or apply the cleanup to the timeline.
How It Works
- BestCutPro analyzes the active sequence or selected range.
- Filler words are detected from the transcript.
- The detected segments are shown in the results area.
- You can preview the analysis before making changes.
- The selected filler ranges are removed from the timeline with your chosen timing settings.
Why It's Useful
- Removes common speaking hesitations quickly.
- Speeds up rough cut cleanup for dialogue-heavy edits.
- Helps make speech sound tighter and more confident.
- Reduces repetitive manual cutting in long-form content.
- Works especially well for podcasts, interviews, tutorials, and YouTube talking-head videos.
Controls
- Scope: Choose whether to analyze the full sequence, only the selected clips, or the In/Out range.
- Language: Select the spoken language manually or use automatic detection.
- Model: Choose between faster or more accurate transcription modes depending on your workflow.
- Filler Words: Use the default filler word list or add your own custom filler terms.
- Padding Start / Padding End: Controls how much extra audio is removed before and after each detected filler word.
- Bridge Gaps: Helps smooth nearby cuts by merging small gaps when appropriate.
- Preview Analysis: Runs detection without cutting, so you can review the results first.
- Apply: Removes the detected filler ranges from the timeline.
Tip
Start with Preview Analysis before applying cuts, especially on longer edits. This gives you a chance to review the detected fillers and adjust padding values for more natural results.
Notes
- Detection quality depends on transcript accuracy and speech clarity.
- Fast speech, overlapping dialogue, and background noise can affect results.
- Custom filler words can improve results for specific creators, habits, or languages.
- For the cleanest edit, use small padding values first and increase only if needed.
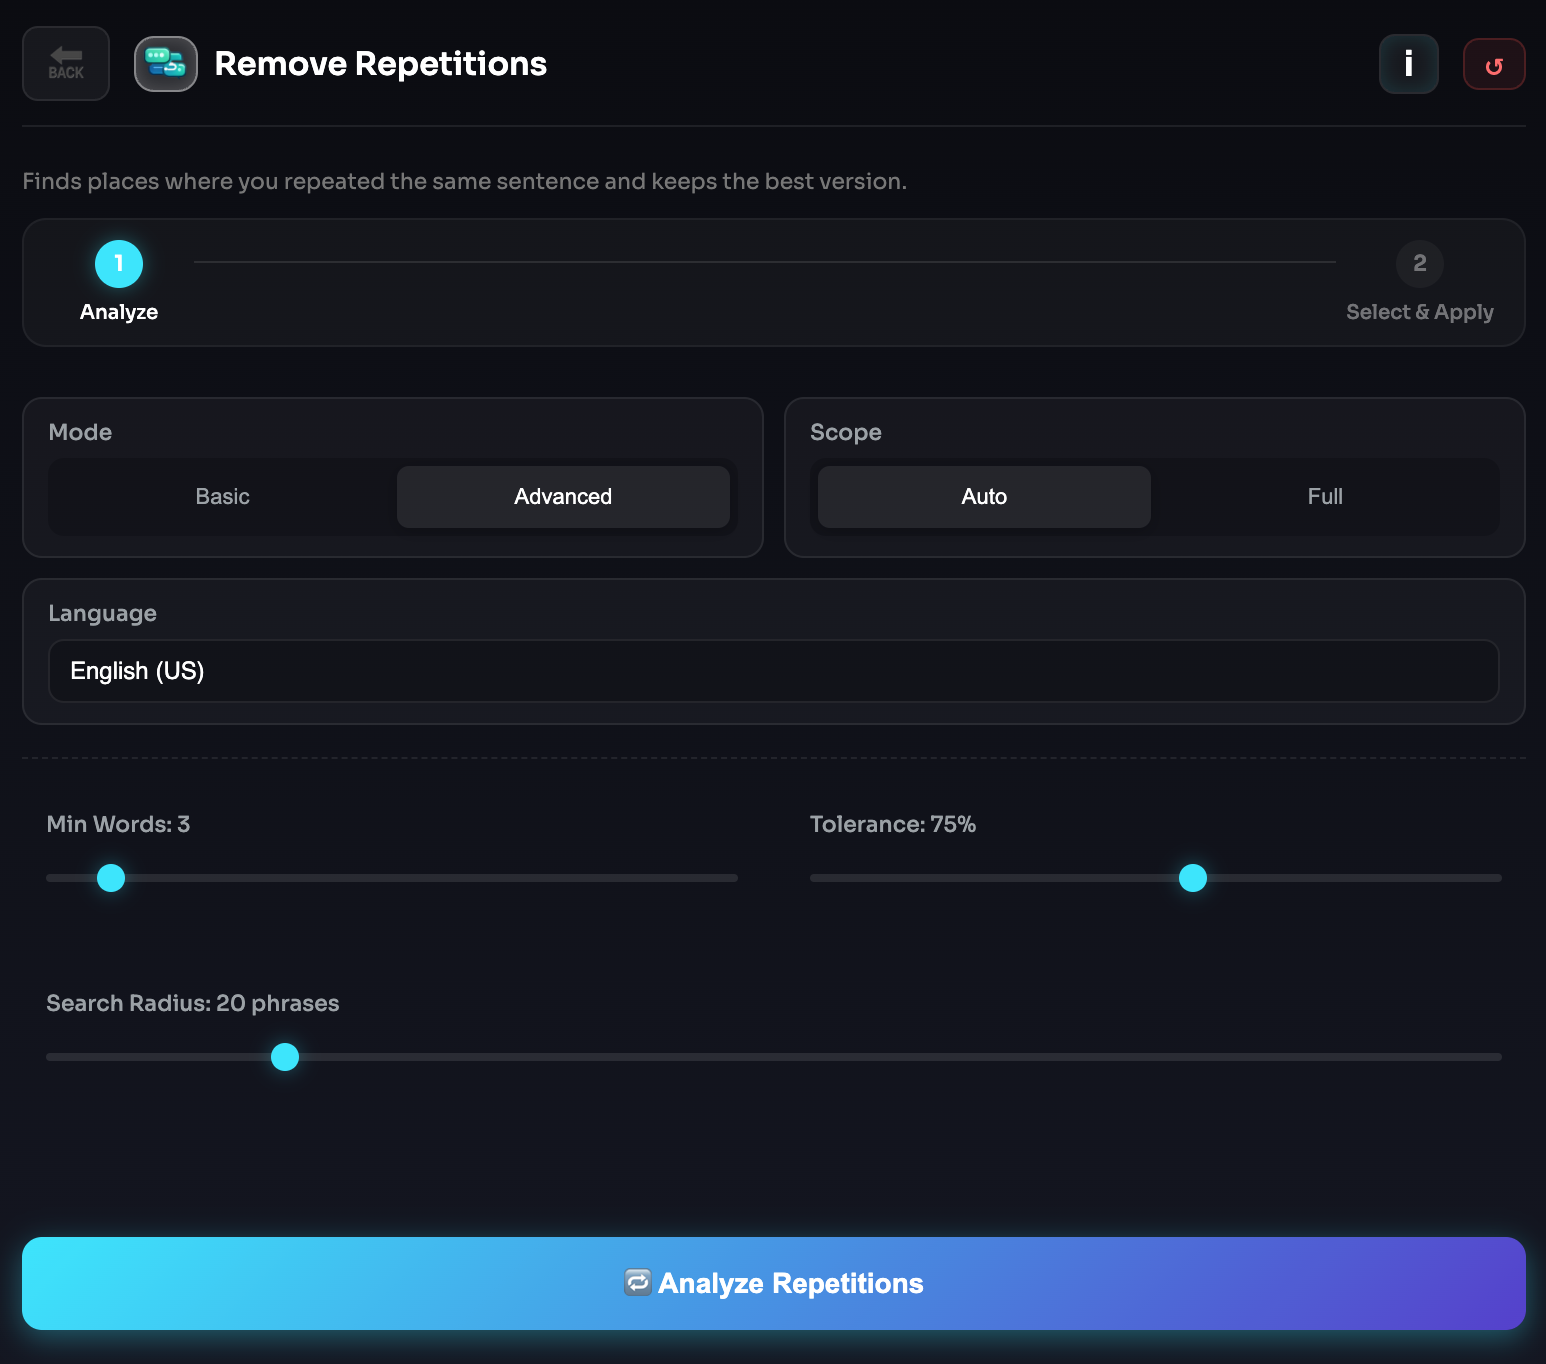
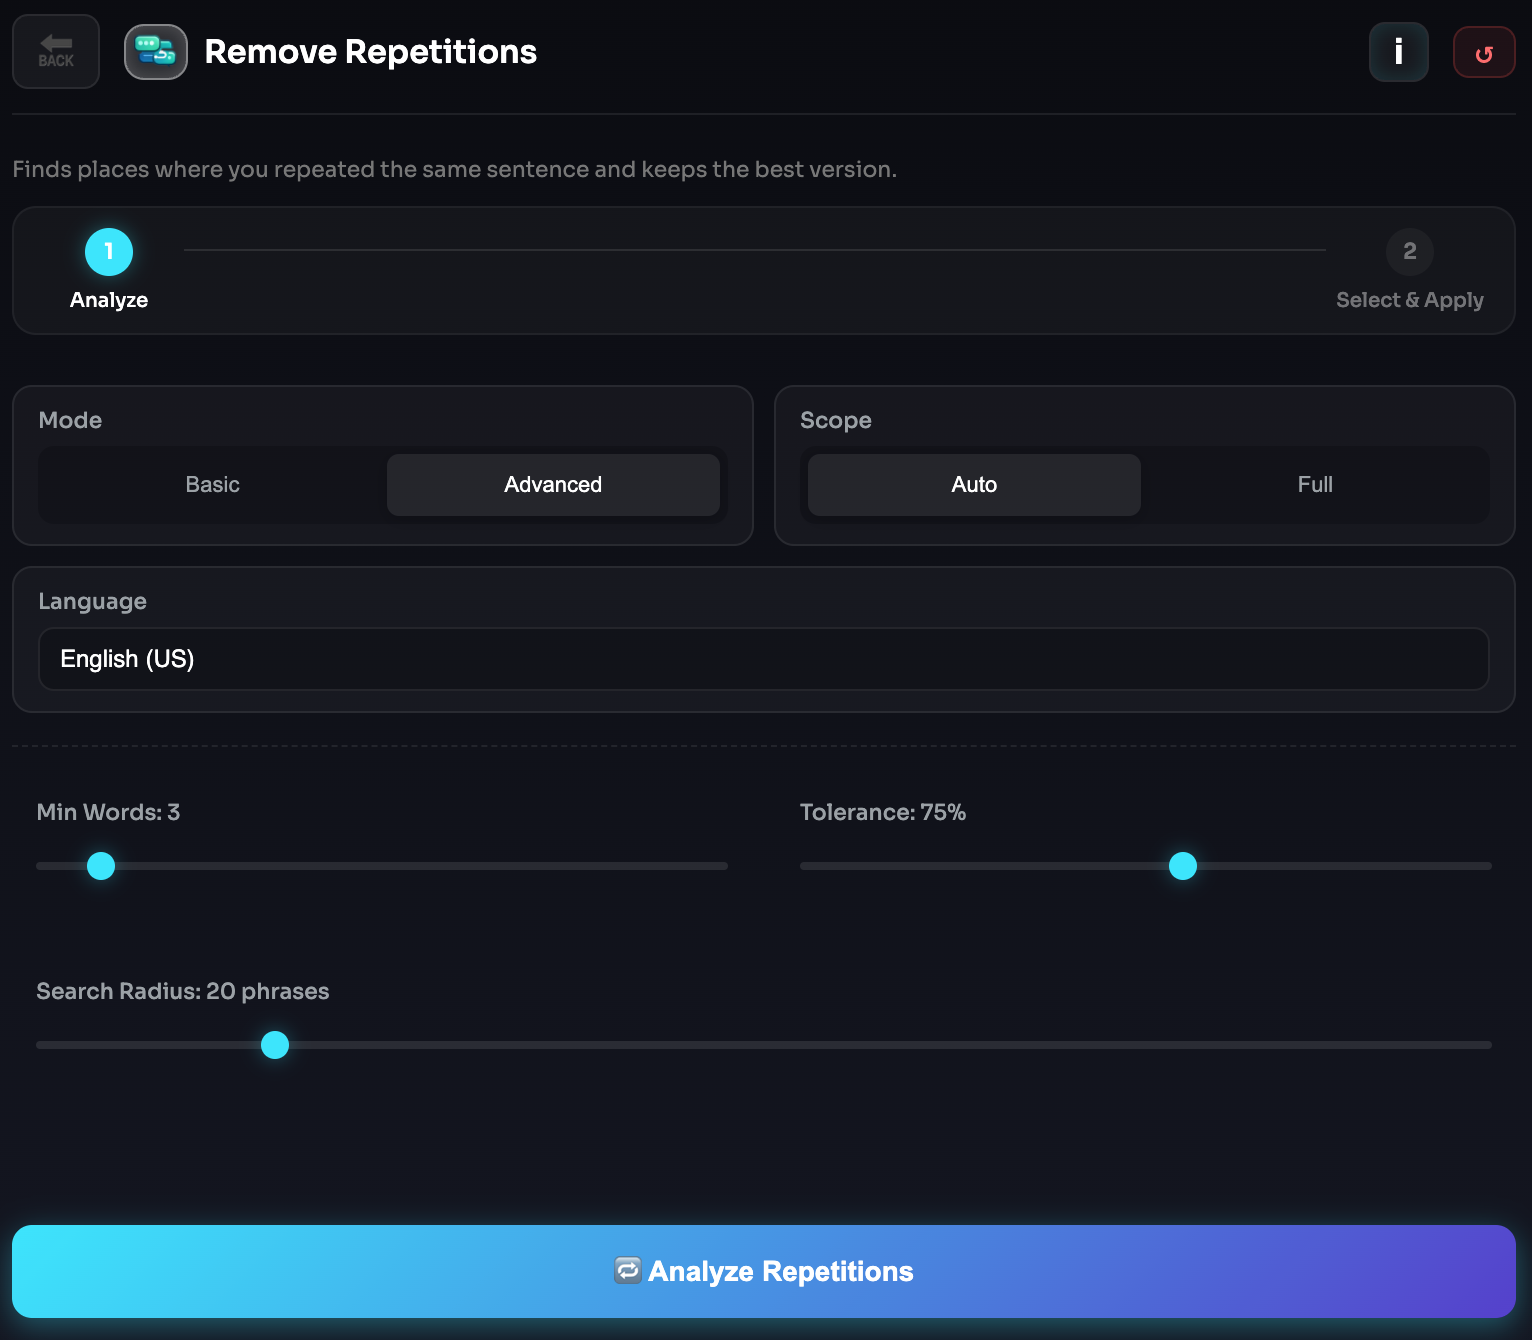
Repetition Remover
Repetition Remover detects repeated takes, duplicate phrases, and multiple attempts of the same sentence, then helps you keep the best version and remove the rest.
It is built for creators who record multiple takes while speaking and want to clean them up much faster inside Premiere Pro.
What It Does
This tool analyzes spoken content in your sequence and groups together repeated lines or very similar takes.
Instead of manually comparing each version one by one, you get a structured view of the detected repetition groups and can quickly decide which take should stay on the timeline.
How It Works
- BestCutPro analyzes the active sequence.
- Similar spoken segments are grouped as repeated takes.
- The grouped results are shown in a review panel.
- You choose which take to keep.
- The remaining repeated takes are removed from the timeline.
Why It's Useful
- Speeds up cleanup for multi-take recordings.
- Helps keep the strongest delivery of each line.
- Reduces manual comparison between repeated phrases.
- Makes talking-head edits, courses, interviews, and podcasts cleaner and faster.
- Especially useful when recording the same sentence multiple times for safety.
Controls
- Analyze Repetitions: Scans the active sequence and finds repeated or similar takes.
- Keep First: Automatically keeps the first take in each detected group.
- Keep Last: Automatically keeps the last take in each detected group.
- Select & Apply: Lets you choose which takes to keep and removes the others from the timeline.
Tip
If you usually restart a sentence and improve the delivery on the second or third try, run the analysis first and compare the grouped takes before applying changes. This gives you a quick way to keep the strongest performance without manually checking every repeated line.
Notes
- Detection quality depends on transcript accuracy and speech clarity.
- Similar but intentionally different lines may sometimes be grouped together, so reviewing the results before applying is recommended.
- Background noise, interruptions, and overlapping dialogue can affect grouping quality.
- Best results come from dialogue-driven edits with clearly separated takes.
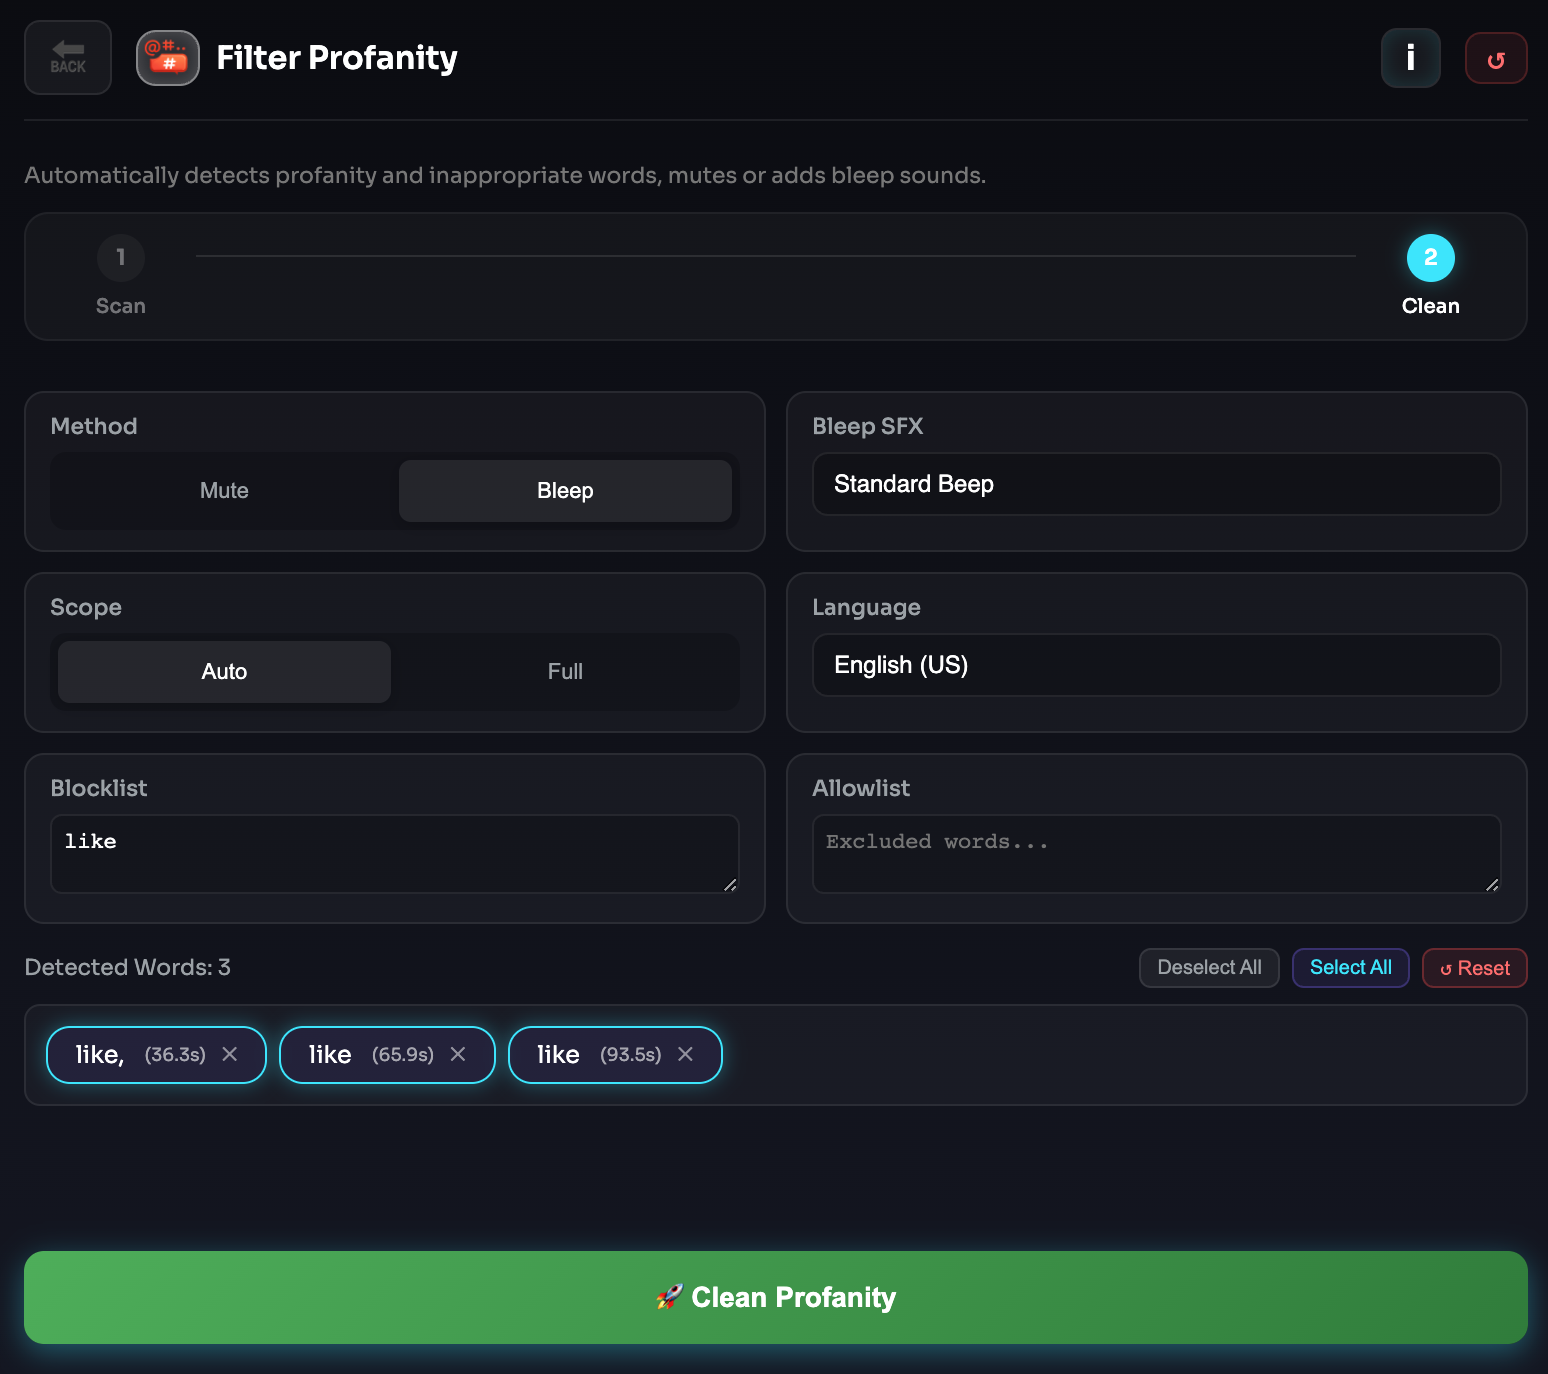
Profanity Filter
Filter Profanity automatically detects profanity, explicit language, and inappropriate words in your sequence, then lets you censor them in just a few clicks.
It is designed for creators who need cleaner edits for YouTube, client work, courses, podcasts, branded content, or ad-safe delivery.
What It Does
This tool scans the spoken content of your timeline, identifies inappropriate words, and shows the results in a review list before anything is applied.
You stay in control of the final edit by deciding which detected words should actually be filtered.
Available Filtering Methods
- Mute
Silences or reduces the audio during the detected profanity range. This is the cleaner and more subtle option when you want the edit to feel natural. - Bleep
Places a censor beep over the detected word. This is useful when you want a more obvious and traditional censorship effect.
How It Works
- BestCutPro analyzes the active sequence.
- Detected profanity appears in a review list.
- You can keep or exclude individual results.
- You choose how the words should be censored.
- The selected filter is applied directly to the timeline.
Why It's Useful
- Saves time compared to manual profanity cleanup.
- Helps catch words that are easy to miss in long edits.
- Makes content more platform-safe and brand-friendly.
- Speeds up editing for podcasts, YouTube videos, courses, and client deliverables.
Controls
- Blocklist: Add words you specifically want the tool to watch for.
- Allowlist: Exclude safe words or false positives from detection.
- Method: Choose whether detected profanity should be muted or replaced with a bleep.
- Scan & Find: Runs the analysis and lists the detected words.
- Apply: Processes the selected words and applies the filter to the timeline.
Tip
After the scan, review the detected words before applying the filter. This helps avoid false positives and gives you more precise control over what gets censored.
Notes
- Detection quality depends on transcript accuracy and speech clarity.
- Heavy background music, noise, or overlapping voices can affect results.
- The bleep option uses a sound effect file from the extension assets.
- For best results, make sure the correct sequence is active before scanning.
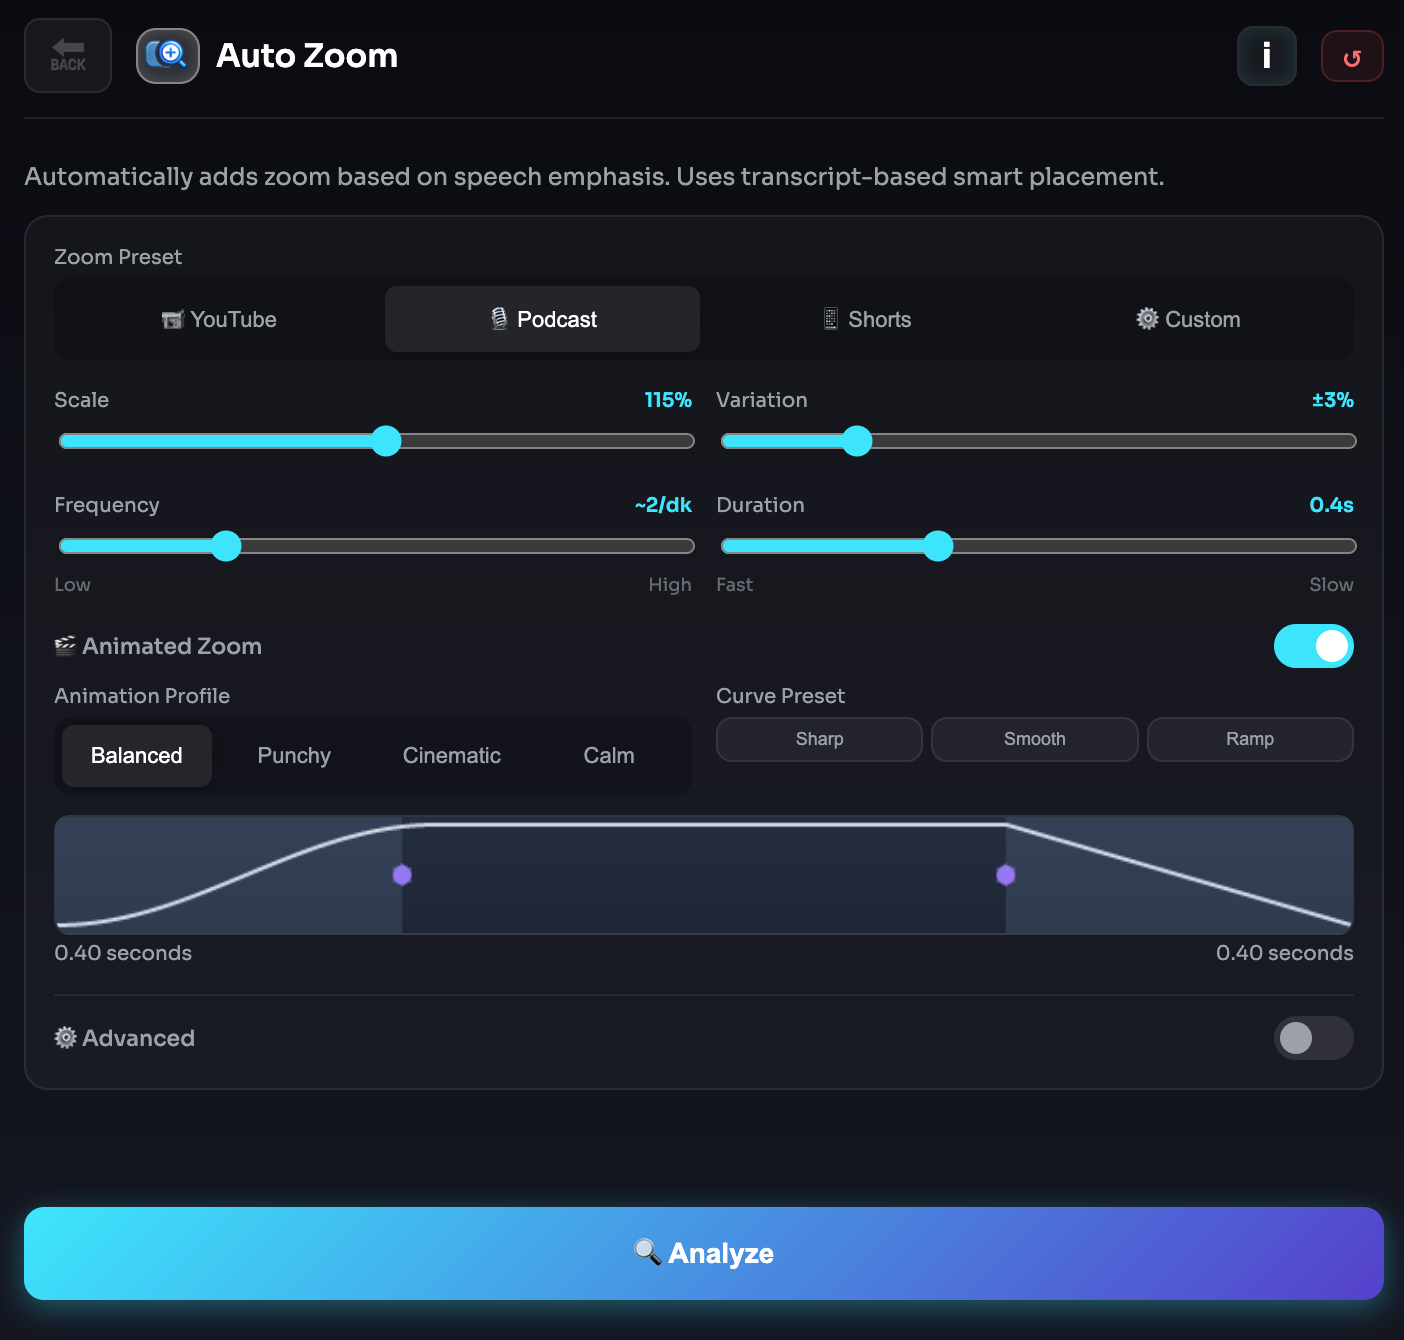
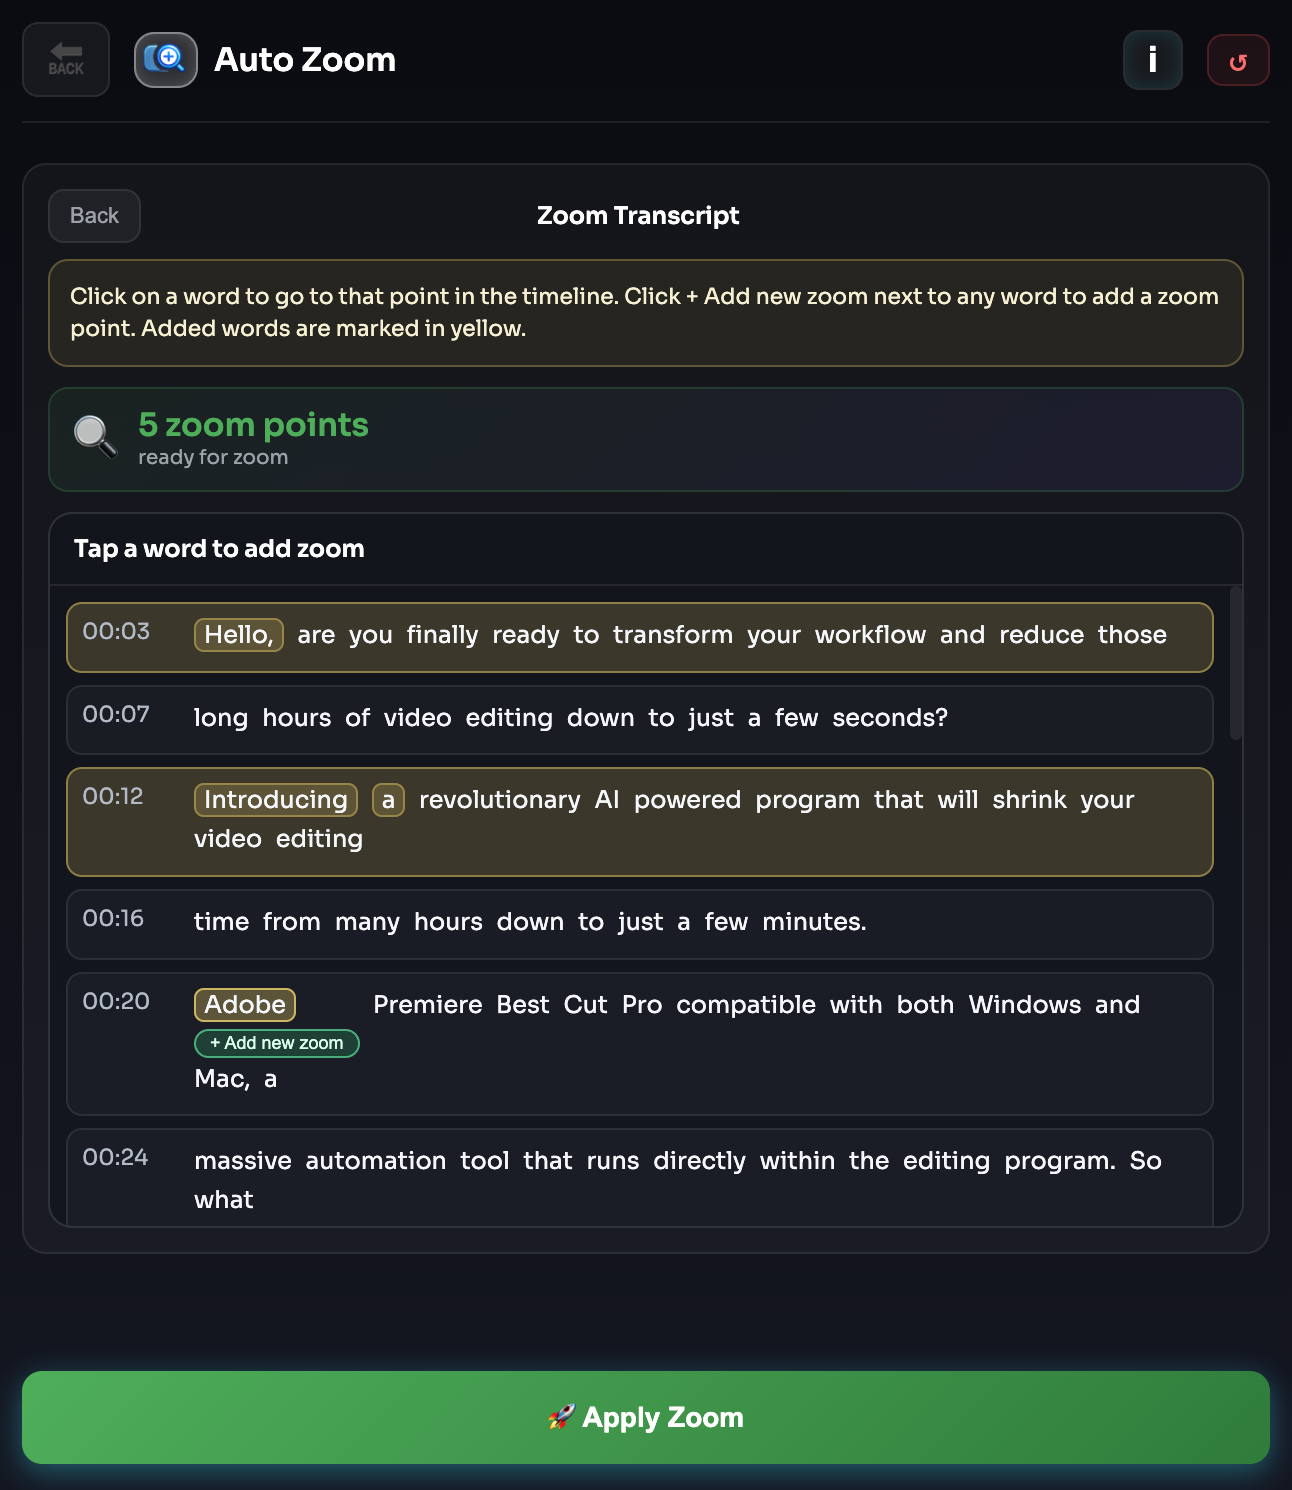
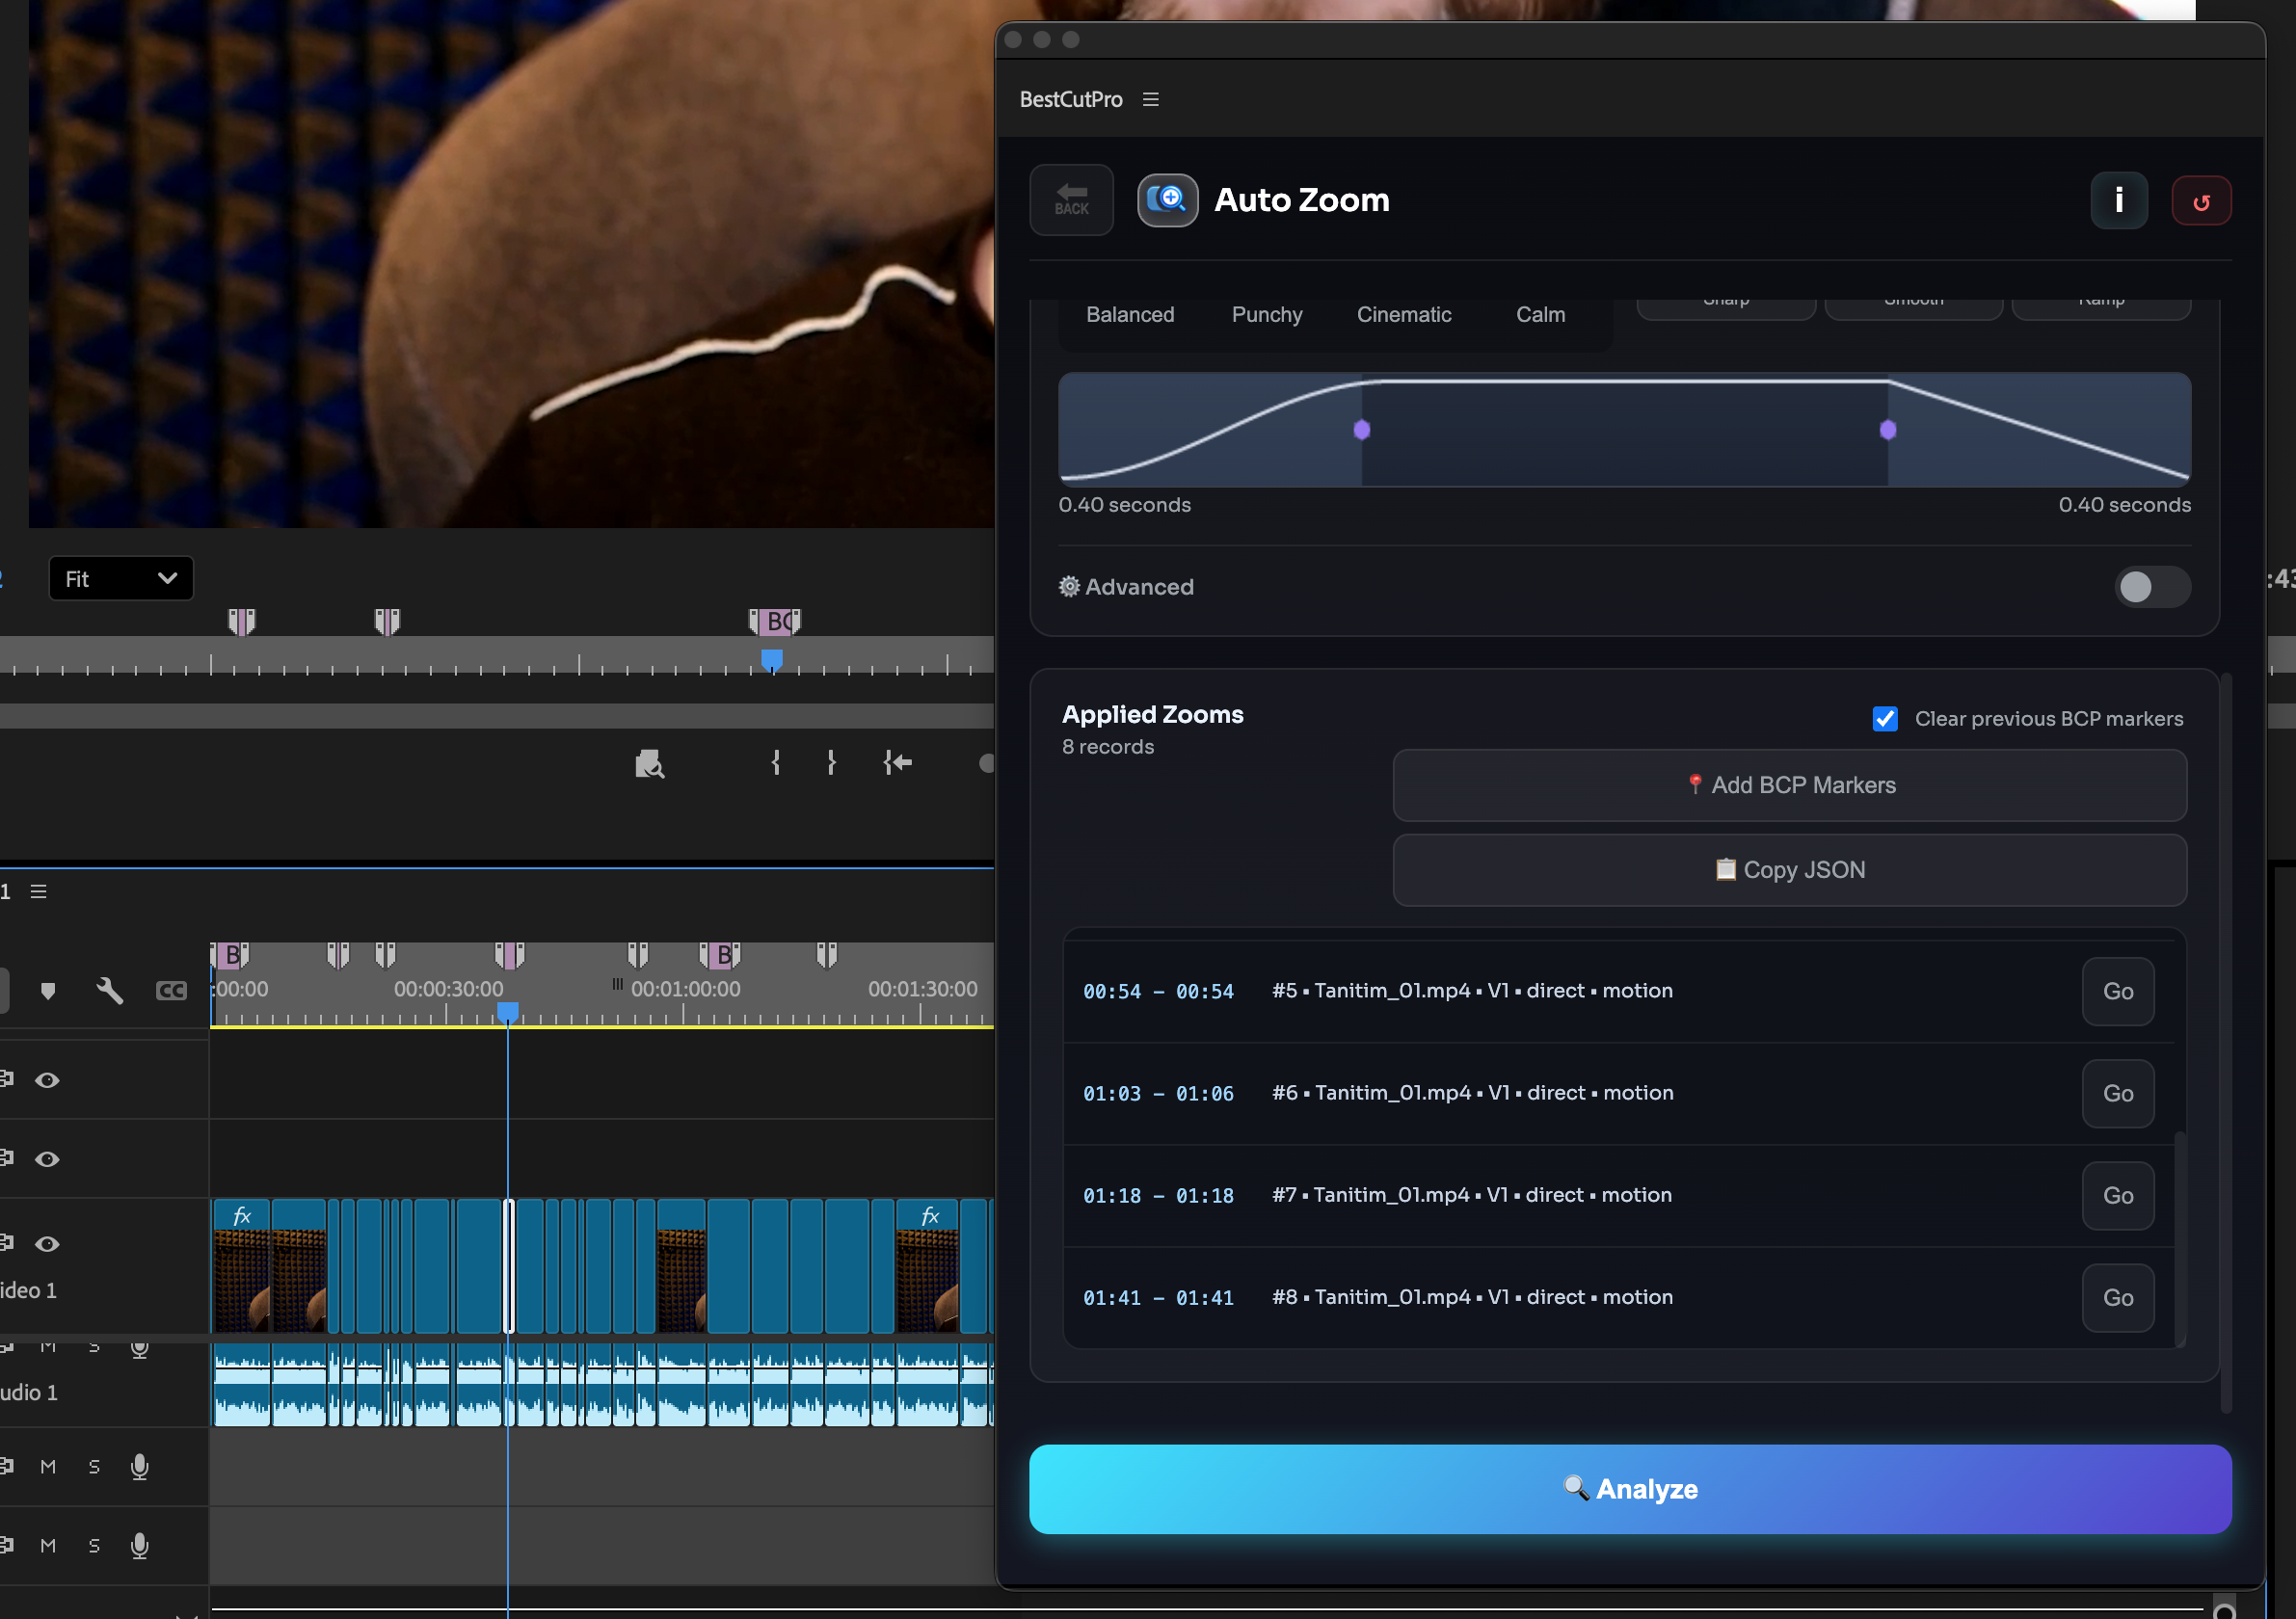
Auto Zoom
Auto Zoom automatically adds zoom points to your sequence based on speech emphasis, pacing, and transcript timing.
It is designed to make talking-head edits feel more dynamic without manually keyframing every zoom by hand.
What It Does
This tool analyzes spoken content and identifies moments where a zoom can improve rhythm, emphasis, or viewer attention.
It then prepares zoom placements that can be applied directly to the timeline using your chosen preset and settings.
How It Works
- BestCutPro analyzes the active sequence.
- Speech-driven emphasis points are detected from the transcript.
- Suggested zoom placements are generated.
- You review the result count and settings.
- The zooms are applied directly to the timeline.
Why It's Useful
- Saves time compared to manual zoom keyframing.
- Adds more energy to talking-head edits.
- Helps emphasize important words and moments.
- Makes educational, podcast, interview, and YouTube content feel more engaging.
- Keeps the editing style more consistent across longer videos.
Controls
- Zoom Preset: Choose a style such as YouTube, Podcast, Shorts, or Custom.
- Scale: Controls how strong each zoom effect will be.
- Variation: Adds natural differences between zoom amounts so the result feels less repetitive.
- Cooldown: Prevents zooms from being placed too close to each other.
- Max Zooms: Limits the total number of zoom points created in the sequence.
- Analyze: Scans the sequence and prepares the suggested zoom points.
- Apply: Places the detected zooms directly on the timeline.
Tip
Start with a moderate zoom scale and low variation, then increase only if the edit still feels too static. For longer videos, fewer well-placed zooms usually feel better than excessive movement.
Notes
- Best results come from clear spoken dialogue.
- Auto Zoom works especially well for talking-head, tutorial, podcast, and commentary content.
- Very fast cuts or highly animated footage may need fewer zoom points.
- Reviewing the suggested result count before applying is recommended for cleaner pacing.
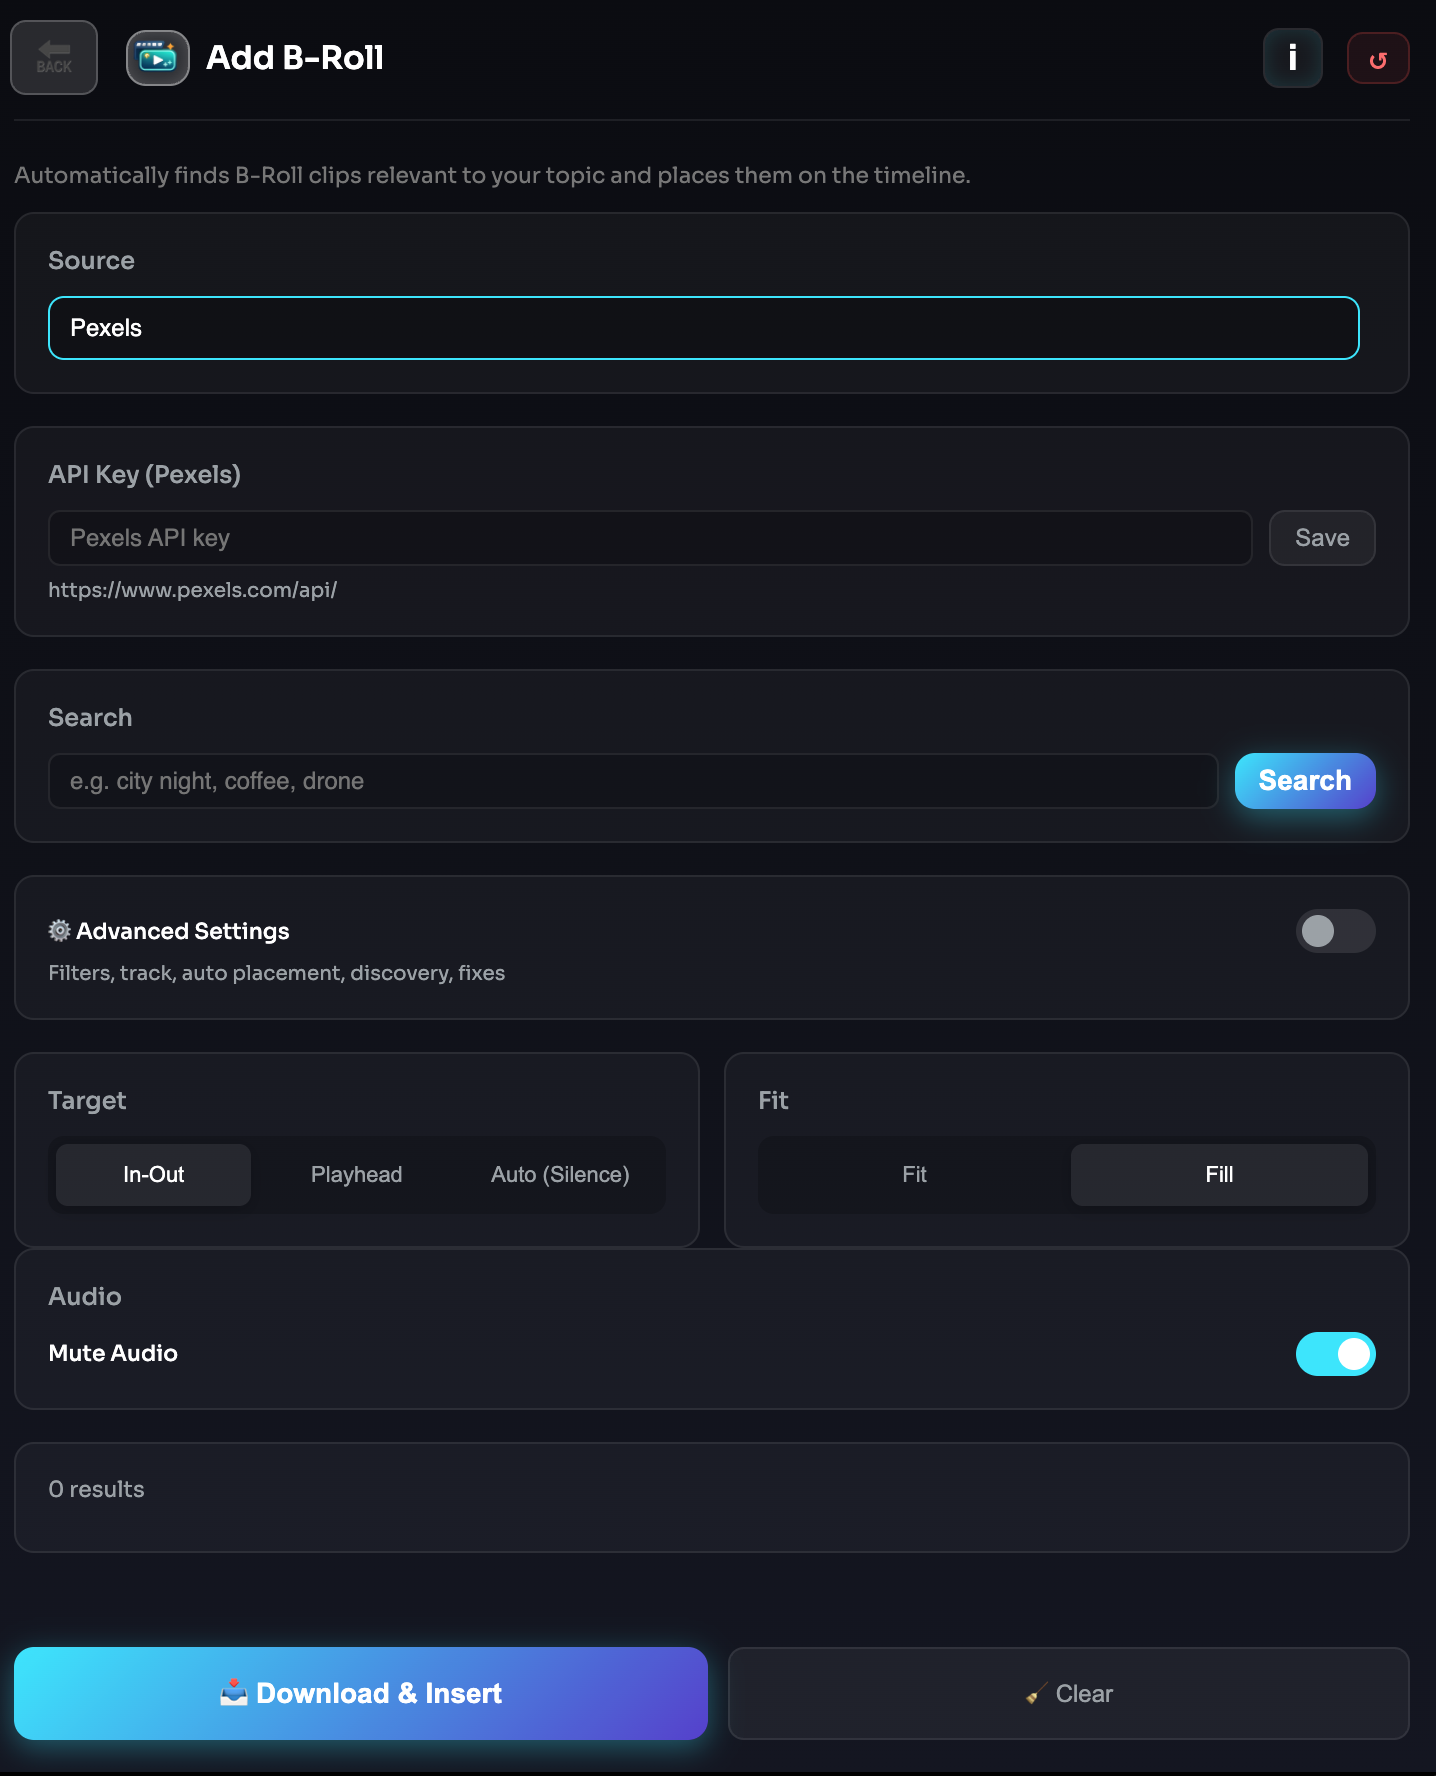
B-Roll Search
B-Roll Search helps you find supporting footage directly inside BestCutPro without leaving Premiere Pro.
It is built to speed up visual research for talking-head videos, tutorials, promos, interviews, social content, and documentary-style edits.
Supported B-Roll Sources
BestCutPro can search across these providers:
- Pexels
- Pixabay
- Shutterstock
- Pond5
- Storyblocks
This gives you access to both free and premium stock options depending on your workflow and subscriptions.
What It Does
This tool lets you search multiple B-roll libraries from one panel and review matching clips in a single workflow.
Instead of opening several stock websites manually, you can search once, compare results faster, and choose visuals that better support your edit.
How It Works
- Enter a keyword, topic, or visual idea.
- BestCutPro searches the supported B-roll providers.
- Matching results are displayed inside the panel.
- You review and compare the clips.
- You choose the footage that best fits your sequence.
Why It's Useful
- Saves time during stock footage research.
- Reduces switching between Premiere Pro and browser tabs.
- Helps you fill visual gaps faster.
- Makes it easier to compare results from multiple stock sources.
- Works well for YouTube videos, interviews, courses, promos, and social content.
Controls
- Search Input: Enter the subject, keyword, or concept you want footage for.
- Search: Runs the query across the supported B-roll providers.
- Results Area: Displays the available clips from integrated sources.
- Preview: Lets you inspect a result before deciding what to use.
Tip
Start with broad visual keywords such as "office", "city", "meeting", or "typing", then refine based on the results. Simple search terms usually produce stronger starting points.
Notes
- Result quality depends on the provider and the keyword used.
- Available footage may differ between free and paid sources.
- Some providers may require your own API access or account setup depending on your configuration.
- Using more visual, concrete search terms usually produces better B-roll matches.
Multi-Camera (Multicam)
Multi Camera helps you organize, analyze, and switch between multiple camera angles faster inside Premiere Pro.
It is designed for interviews, podcasts, panel recordings, webinars, educational shoots, and any edit where more than one camera is used in the same timeline.
What It Does
This tool helps you work with multi-camera timelines more efficiently by analyzing camera tracks and assisting with angle decisions based on the structure of the edit.
Instead of manually checking every track and switching angles by hand across the full timeline, you get a more guided workflow for reviewing and managing camera changes.
Core Workflow
The Multi Camera section is built around camera-track analysis and angle decision support.
It helps you inspect your available camera tracks, evaluate sync-related situations, and prepare cleaner switching choices before applying them to the timeline.
Available Analysis Tools
- Speaker Analysis: Analyzes the sequence to help identify which camera angle may be more appropriate based on who is speaking or where the active dialogue is concentrated.
- Silent Track Analysis: Checks tracks for inactive or silent sections so you can quickly spot cameras or audio-linked sections that are not contributing to the current part of the edit.
These tools are especially useful when reviewing long-form conversations or multi-person recordings where manual angle checking becomes repetitive.
What It Helps With
- Reviewing multiple camera tracks more efficiently.
- Understanding which tracks are active or inactive.
- Supporting angle-switch decisions in dialogue-driven edits.
- Speeding up rough cut work for podcasts, interviews, and multi-person productions.
- Reducing manual timeline inspection in long recordings.
Best Use Cases
Multi Camera works especially well for:
- Podcast recordings
- Interviews
- Talking-head shoots with backup angles
- Two-camera and three-camera educational content
- Webinars and discussion panels
- Studio-style multi-angle productions
How It Works
- Open the Multi Camera tool inside BestCutPro.
- Review the available camera tracks in your sequence.
- Run the relevant analysis mode.
- Inspect the returned track activity or speaking-based guidance.
- Use the results to make faster switching and cleanup decisions in the edit.
Why It's Useful
- Saves time in multi-angle editing workflows.
- Helps reduce repetitive track-by-track review.
- Makes it easier to understand timeline activity across cameras.
- Supports cleaner and faster decision-making during edit passes.
- Useful for both rough cuts and refinement stages.
Controls
- Analyze Speaker: Evaluates speaking activity to help identify stronger angle choices.
- Analyze Silent Tracks: Finds inactive or less useful track sections for faster review.
- Summary Area: Displays the current status and analysis feedback for the active sequence.
Tip
For best results, make sure your camera tracks are clearly organized before running analysis. Cleaner timelines and better sync structure lead to more useful multi-camera guidance.
Notes
- Results depend on how well the sequence is organized and synced.
- Multi Camera analysis is most useful in dialogue-driven edits.
- Sequences with overlapping speech, heavy background noise, or inconsistent track structure may require manual review after analysis.
- This tool is meant to assist switching decisions, not replace editorial judgment.
AI Director (Director's Cut)
AI Director helps you turn a long sequence into a tighter, more intentional edit by analyzing the content and suggesting stronger cuts, highlights, and structure.
It is designed for creators who want faster editorial decisions without manually reviewing every second of footage.
What It Does
This tool reviews your sequence and looks for moments that are more likely to be useful in the final edit, such as strong hooks, higher-energy sections, and key points.
It then presents suggestions that help you shape a more focused version of the timeline.
Supported Editing Modes
- YouTube Mode: Optimized for longer-form content where pacing, retention, and topic flow matter across a full video.
- Reels Mode: Focused on short-form editing where strong hooks, compressed pacing, and fast highlight selection are more important.
Key Signals It Looks For
AI Director is designed to identify moments such as:
- Hook: A strong opening moment that can capture attention early.
- High Energy: More intense, engaging, or emphasized sections of the content.
- Key Point: Important statements, summaries, or moments with higher informational value.
These suggestions help you quickly understand where the strongest editorial opportunities are inside a long sequence.
How It Works
- Choose the editing mode.
- Run the analysis on the active sequence.
- Review the suggested moments and insights.
- Inspect the strongest candidate sections.
- Use the suggestions to build a tighter cut or mark important parts of the timeline.
Why It's Useful
- Speeds up editorial review on long recordings.
- Helps identify stronger opening and highlight moments.
- Supports faster rough-cut creation.
- Makes content structure easier to evaluate.
- Useful for YouTube edits, reels, interviews, podcasts, and educational videos.
Controls
- Mode: Choose between YouTube and Reels workflows.
- Reels Duration: In short-form mode, controls the target duration for the suggested edit.
- Minimum Score: Filters weaker suggestions and keeps only stronger candidates.
- Suggestion Count: Controls how many recommendations the tool should return.
- Analyze: Runs the AI-driven review of the active sequence.
- Add Markers: Places markers on the suggested moments for easier review inside the timeline.
- Apply Master Cut: Uses the selected suggestions to help build a more focused cut.
Actionable Insights
In addition to clip suggestions, AI Director can provide higher-level editing insights that help you understand where the video becomes stronger, where pacing improves, and where the most valuable moments are concentrated.
Tip
For long-form edits, start in YouTube Mode to understand the overall structure first. For short-form content, use Reels Mode with a shorter target duration to quickly surface the strongest moments.
Notes
- Suggestions are meant to support editorial decisions, not replace them.
- Best results come from dialogue-driven or story-driven content with clear topic progression.
- Final quality still depends on your judgment, pacing preference, and creative intent.
- Reviewing the suggestions before applying changes is recommended.
Highlights
Highlights helps you automatically find the most important moments in your video so you can review, extract, and repurpose the strongest parts faster.
It is designed for creators working with interviews, podcasts, tutorials, commentary videos, webinars, and other long-form content.
What It Does
This tool analyzes your sequence and identifies standout moments that are more likely to be useful as highlights.
These can include moments with stronger emphasis, key statements, engaging reactions, or higher-value sections that deserve extra attention during editing.
How It Works
- BestCutPro analyzes the active sequence.
- Important moments are detected based on content signals.
- Highlight suggestions are generated.
- You review the detected results.
- The strongest moments can be used for faster editing, clipping, or repurposing.
What It Helps With
Highlights is useful for finding:
- important talking points
- strong reactions
- memorable quotes
- standout educational moments
- short-form clipping opportunities
- sections worth promoting or reusing
Why It's Useful
- saves time when reviewing long recordings
- helps surface the most valuable moments faster
- useful for repurposing long-form content into shorter clips
- improves editing speed for highlight-based workflows
- helps identify moments worth promoting on social media
Best Use Cases
Highlights works especially well for:
- podcasts
- interviews
- YouTube videos
- webinars
- tutorials
- educational recordings
- commentary content
- social clip extraction workflows
Controls
- Analyze: Runs highlight detection on the active sequence.
- Results Area: Displays the detected highlight suggestions.
- Review / Apply: Lets you inspect the suggested moments before deciding how to use them.
Tip
Highlights works best on content with clear speech, strong pacing changes, or moments of emphasis. It is especially useful when you want to turn a long recording into short-form clips or promos.
Notes
- Highlight quality depends on transcript quality and content clarity.
- Results are meant to assist editorial review, not replace judgment.
- Reviewing the detected moments before using them is recommended.
- This tool is especially valuable for content repurposing and faster rough-cut decisions.
Stock Music
Stock Music helps you find background music for your edits directly inside BestCutPro.
It is designed to speed up music discovery for YouTube videos, podcasts, interviews, tutorials, promos, and social media content without constantly switching between Premiere Pro and external music libraries.
Supported Music Sources
BestCutPro can search across these music providers:
- FreeSound
- Jamendo
This gives you quick access to music options for different editing styles and content types.
What It Does
This tool lets you search for music tracks from integrated sources, review the results, and choose audio that better matches the tone of your edit.
It is useful when you want to add energy, atmosphere, pacing, or emotional direction to a sequence.
How It Works
- Enter a keyword, mood, genre, or use case.
- BestCutPro searches the supported music sources.
- Matching tracks are displayed inside the panel.
- You review the available results.
- You choose the track that fits your edit best.
Why It's Useful
- Speeds up music discovery during editing.
- Reduces time spent browsing multiple external music sites.
- Helps match the tone of your content more quickly.
- Useful for both long-form and short-form projects.
- Makes background music selection more streamlined inside the workflow.
Best Use Cases
Stock Music works especially well for:
- YouTube videos
- Tutorials
- Interviews
- Podcast highlights
- Promotional videos
- Social media edits
- Mood-based montage work
Controls
- Search Input: Enter a keyword, genre, mood, or musical idea.
- Search: Runs the query across supported stock music sources.
- Results Area: Displays available tracks returned by the integrated providers.
- Preview: Lets you review the track before deciding whether to use it.
Tip
Try searching by mood or use case instead of only genre. Terms like "cinematic", "uplifting", "calm background", or "tech promo" often produce more useful editing results than generic music labels alone.
Notes
- Search results depend on the provider and the query used.
- Different sources may have different licensing and usage terms.
- Previewing tracks before use is recommended so the music fits your pacing and tone.
- Music selection works best when treated as part of the edit rhythm, not just background filler.
Detect Chapters
Detect Chapters helps you automatically find meaningful section breaks inside a video and turn them into clear chapter suggestions.
It is designed for long-form content such as YouTube videos, podcasts, tutorials, interviews, webinars, and educational recordings where structure matters.
What It Does
This tool analyzes your sequence and detects natural transitions between topics, segments, or discussion points.
Instead of manually scrubbing through the timeline and placing chapter points one by one, you get a faster way to organize the video into clear sections.
How It Works
- BestCutPro analyzes the active sequence.
- Topic changes and structural breakpoints are detected.
- Chapter suggestions are generated.
- You review the detected sections.
- The results can be used to improve structure, navigation, and publishing workflow.
What It Helps With
Detect Chapters is useful for identifying:
- topic transitions
- new discussion sections
- segment boundaries
- major content shifts
- moments suitable for chapter markers
This makes it especially useful for longer edits where manual chapter creation takes extra time.
Why It's Useful
- saves time on long-form content organization
- makes videos easier to navigate
- helps structure content more clearly for viewers
- supports cleaner YouTube chapter workflows
- improves post-production efficiency for spoken content
Best Use Cases
Detect Chapters works especially well for:
- YouTube long-form videos
- podcasts
- tutorials and courses
- interviews
- educational content
- webinars
- commentary videos
Controls
- Analyze: Runs chapter detection on the active sequence.
- Results Area: Displays the detected chapter suggestions.
- Review / Apply: Lets you inspect the suggested structure before using it in your workflow.
Tip
Detect Chapters works best when the video has clear topic flow and spoken transitions. The more structured the original content is, the better the chapter suggestions usually become.
Notes
- Chapter quality depends on transcript quality and topic clarity.
- Very loose or highly unstructured conversations may produce weaker results.
- Reviewing the detected chapters before publishing is recommended.
- This tool is meant to support editorial organization, not replace final judgment.
Auto Captions
Auto Captions helps you generate subtitles directly from the spoken content in your sequence and apply them inside Premiere Pro.
It is designed for creators who want faster caption workflows for YouTube videos, podcasts, interviews, tutorials, courses, and short-form content.
What It Does
This tool transcribes the speech in your sequence, creates subtitle text, and lets you work with captions inside your editing workflow.
It can be used for both standard subtitle generation and more visual caption-based workflows depending on how you want the final result to appear.
How It Works
- BestCutPro analyzes the active sequence.
- Speech is transcribed into subtitle text.
- Captions are generated from the transcript.
- You review the output and selected style.
- The captions are applied to the sequence.
What It Helps With
Auto Captions is useful for:
- creating subtitles for spoken content
- improving accessibility
- making videos easier to follow without sound
- preparing short-form videos for social platforms
- speeding up caption workflows inside Premiere Pro
Caption Workflow Options
Depending on your workflow, Auto Captions can be used for:
- subtitle generation from transcript
- caption preview before applying
- styled caption workflows
- sequence-ready caption placement
This makes it useful for both clean subtitle delivery and more visual caption-based editing styles.
Why It's Useful
- saves time compared to manual captioning
- helps create subtitles directly inside the edit workflow
- useful for both long-form and short-form videos
- improves accessibility and viewer retention
- supports faster publishing for caption-heavy content
Best Use Cases
Auto Captions works especially well for:
- YouTube videos
- podcasts
- interviews
- educational content
- talking-head videos
- short-form content
- social media clips
- tutorials and courses
Controls
- Transcribe / Generate: Analyzes speech and creates the caption content.
- Preview: Lets you inspect the result before applying it.
- Add Styled Captions to Sequence: Places the styled caption output into the active sequence.
Tip
Always preview the caption result before applying it to the timeline, especially on fast speech or noisy recordings. This helps you catch timing or wording issues early.
Notes
- Caption quality depends on transcript quality and speech clarity.
- Heavy background noise, overlapping voices, or unclear speech can affect results.
- Styled caption workflows may be more suitable for short-form and social content.
- Reviewing the generated captions before final export is recommended.
Export Pack
Export Pack is an upcoming workflow tool for preparing multi-platform export plans more efficiently inside BestCutPro.
It is intended for creators who need to organize exports for formats such as YouTube, Shorts, Reels, and square social media deliverables from a single editing workflow.
Coming Soon
This section is currently in development.
More details will be added as the feature becomes available.
Planned Focus
Export Pack is being designed to help with:
- multi-format export planning
- platform-oriented output preparation
- faster delivery workflows for social and long-form content
Note
This feature is marked as Coming Soon and may change before final release.
Performance & Logs
Performance & Logs gives BestCutPro a built-in diagnostics layer for troubleshooting, support, and workflow visibility.
The app records important runtime events, feature activity, update flow details, and targeted module diagnostics so issues can be traced more clearly when something does not behave as expected.
What It Does
BestCutPro writes structured diagnostic entries during normal use. These logs help track what the panel is doing, what step a tool reached, and where a workflow may have failed.
This includes areas such as:
- startup and initialization
- transcript and caption workflows
- silence analysis and cut timing
- profanity filtering
- dependency checks
- update and restart flow
- runtime errors and support diagnostics
Main Log File
The main application log is stored as:
history.log
Inside the extension root, for example:
- Windows: inside the installed BestCutPro extension folder
- macOS: inside the installed BestCutPro extension folder
The log file is initialized in the panel runtime and used throughout the app as the central event log.
Update and Restart Logs
BestCutPro also uses a writable updater folder for update-related diagnostics.
Updater root:
- Windows:
%APPDATA%\BestCutPro\updater - macOS:
~/Library/Application Support/BestCutPro/updater
Examples include:
restart-win.logrestart-mac.log
These logs are especially useful when diagnosing automatic update, relaunch, or restart behavior.
Logging Structure
BestCutPro uses readable tagged log entries rather than opaque internal IDs. This makes logs easier to inspect manually and easier to request from end users during support.
Common log groups include:
General Runtime
Plugin Baslatildi - Rebuild ModuINIT_ERRJS_RUNTIME_ERR
Updates
AUTO_UPDATE_ERRUPDATE_RESTART_WIN_SCHEDULEDUPDATE_RESTART_MAC_SCHEDULEDUPDATE_SHA256_WARNUPDATE_PROMPT_ERR
Captions
CAPTIONS_TRANSCRIPT_OKCAPTIONS_PREVIEW_FRAME_OKCAPTIONS_PNG_ADD_FAIL
Profanity Filter
PROFANITY_UI_APPLY_STARTPROFANITY_UI_RESULT_RAWPROFANITY: Range ...PROFANITY: Finished ...
Silence Remover Performance
RS_PERF#...RS_WARMUP_STARTRS_WAVE_OKCLOSE_GAPS_OK
These prefixes make it easier to isolate a single feature area without reading unrelated log output.
Performance Instrumentation
Some modules, especially heavier editing tools, include timing markers to help identify slower stages in the workflow.
A good example is Silence Remover, which records staged timing with entries such as:
- run start
- overlay shown
- warmup start / end
- detection start
- waveform generation
- JSX apply completion
This makes it possible to see where time is spent during analysis and cutting, rather than only knowing whether the tool succeeded or failed.
Support Diagnostics
BestCutPro also includes a support-oriented diagnostics builder. When needed, it can collect a compact technical snapshot including:
- app version
- platform
- active module/view
- language
- license state
- transcript provider status
- dependency state
- Premiere version and connection state
- recent
history.loglines
This is the same diagnostic context used when copying support details or opening the feedback flow.
Why It's Useful
- helps identify where a workflow failed
- makes support requests more actionable
- gives visibility into update, caption, and transcript issues
- improves debugging for platform-specific behavior
- provides performance timing for heavier analysis modules
Notes
- Logs are written as plain text for easier inspection.
- The main log is feature-rich and cumulative, so recent lines are usually the most useful.
- Update and restart logs are stored separately from the main extension log.
- Diagnostic logging is meant to support troubleshooting, not replace editorial review or user testing.
Troubleshooting & FAQ
BestCutPro panel does not appear in Premiere Pro
Make sure the extension was installed correctly and restart Premiere Pro fully. Then open it from:
Window > Extensions > BestCutPro
If it still does not appear, reinstall the extension and reopen Premiere.
The panel opens, but some tools do not work
BestCutPro depends on the active Premiere Pro sequence, transcript flow, and some external tools depending on the feature. Check the following first:
- a sequence is open and active
- media exists in the timeline
- the correct clips or range are selected when required
- FFmpeg / FFprobe is available for tools that need media processing
- your API keys are set if the selected workflow depends on cloud services
Auto update failed
If automatic update fails, BestCutPro may fall back to a manual package. In newer versions, update diagnostics are also shown in the update window.
Check:
- whether the extension folder is writable
- whether admin approval is needed on Windows
- whether the update package downloaded correctly
- whether restart completed successfully after update
Update-related diagnostics may also exist in:
history.logrestart-win.logrestart-mac.log
Premiere closed after update but did not restart
This usually means the relaunch step failed, not the update package itself.
Check:
- whether Premiere was installed in a non-standard location
- whether system permissions blocked relaunch
- whether the restart log contains a launch error
On Windows, restart diagnostics may be written to:
%APPDATA%\BestCutPro\updater
On macOS, restart diagnostics may be written to:
~/Library/Application Support/BestCutPro/updater
Auto Captions preview does not load
This is usually caused by missing preview frame access, invalid file path handling, or media lookup issues.
Check:
- the sequence contains valid source media
- the media path is still valid on disk
- the project is not referencing offline footage
- the active sequence is the correct one
"Add Styled Captions to Sequence" failed
If styled captions do not appear in the timeline, the most common causes are:
- PNG caption items were not generated correctly
- Premiere could not import the generated assets
- timeline insertion failed on the target track
- path transfer between panel and JSX failed
If needed, check history.log for entries such as:
CAPTIONS_PNG_ADD_FAILCAPTIONS_PNG_RENDER_ERR
Profanity scan finds words, but Apply does nothing
This usually means the detection worked but the timeline apply stage failed.
Possible causes:
- no valid synced ranges after selection filtering
- locked audio tracks
- no matching clip at the detected range
- bleep sound import failed
- QE / insert step failed in Premiere
Relevant log entries may include:
PROFANITY_UI_SYNCEDPROFANITY_UI_RESULT_RAWPROFANITY: Range ...PROFANITY: Finished ...
Silence Remover preview worked, but cuts were not applied
This usually means the analysis phase completed but the apply phase failed.
Check:
- whether the timeline contains valid clips in the selected scope
- whether In/Out range is valid
- whether selected tracks are correct
- whether the target tracks are locked
- whether there are actually removable silence ranges after thresholds and padding are applied
Useful log entries include:
RS_PERFCLOSE_GAPS_ERRCLOSE_GAPS_OK
Filler Remover or Repetition Remover results look inaccurate
These tools depend heavily on transcript quality and timing alignment.
Things that can reduce quality:
- unclear speech
- overlapping voices
- strong background music
- poor source audio
- wrong language/model choice
For best results:
- use the correct language
- preview analysis first
- review results before applying edits
- use cleaner source audio when possible
FFmpeg or Whisper is missing
Some BestCutPro features rely on local dependencies such as FFmpeg, FFprobe, or Whisper.
You can:
- use the built-in dependency checks in Settings
- set the FFmpeg path manually
- use auto-install or fallback flows if available
- switch to cloud transcript workflows when local tools are unavailable
Where are logs stored?
The main application log is:
history.log
It is stored inside the BestCutPro extension folder.
Additional updater logs may be stored in:
- Windows:
%APPDATA%\BestCutPro\updater - macOS:
~/Library/Application Support/BestCutPro/updater
What should I send to support?
When reporting an issue, include:
- BestCutPro version
- operating system
- Premiere Pro version
- which module failed
- what you expected to happen
- what actually happened
- the most relevant recent lines from
history.log
If the problem is update-related, also include:
restart-win.logorrestart-mac.log
Tip
If a feature supports preview or pre-analysis, run that first before applying changes. It usually makes troubleshooting much easier because it separates detection problems from timeline-apply problems.
Billing & Account
License Access
BestCutPro uses a license-based access system. After completing your purchase, you receive the information needed to activate the product and use licensed features inside the panel.
Your license is typically connected to:
- your purchase email
- your license key
- your order or billing record
Billing Provider
Payments and subscription-related billing are handled through LemonSqueezy.
This includes workflows such as:
- purchase confirmation
- billing receipts
- subscription management
- payment method updates
- renewal handling
- customer portal access
What You Can Manage
Depending on your purchase type, you may be able to manage:
- your subscription status
- billing details
- payment method
- invoice history
- renewal or cancellation settings
- license-related purchase records
Customer Portal
If your order includes customer portal access, LemonSqueezy sends that link to your purchase email.
You can use it to manage your billing and account-related settings without contacting support for common account actions.
Common Questions
I purchased BestCutPro but cannot activate it
Make sure you are using the same purchase details and the correct license key. Also confirm that your internet connection is available for license verification.
I did not receive my purchase email
Check your spam or promotions folder first. If it is still missing, contact support and include the email address used during checkout.
How do I update my payment method?
Use your LemonSqueezy customer portal link from the purchase email.
How do I cancel or manage my subscription?
Use the billing portal provided by LemonSqueezy. If you cannot access it, contact support.
Can I get my invoice or receipt again?
Yes. Billing documents are typically available through the purchase email or customer portal.
Support
For billing or account-related issues, contact:
When contacting support, include:
- your purchase email
- your order reference if available
- a short description of the issue
Notes
- Billing and payment operations are managed outside the Premiere panel.
- License verification inside BestCutPro may require an internet connection.
- Account and billing access depends on the email used during purchase.
- For the fastest support, always use the same email address that was used at checkout.